Replacing, adding, and mixing sound profiles
Creating a way for users to personalise their sound profiles.
Concha Labs
Background and context
The Concha Labs™ App is a hearing aid app that allows users to personalise their hearing straight from home. Our users must purchase our hearing aids, download the app, and then take Soundscope® in order to receive their personalised sound profiles. The hearing aids are Over-The-Counter (OTC) FDA approved.
Understanding the problem
The problem
When I joined Concha Labs, we were working with hearing aids that were not linked, which led to a difficult process when wanting to make simple adjustments such as changing volume or editing a sound profile, as users had to do each action twice for each hearing aid.
Since we knew we were going to link the hearing aids soon, we had to design a way for our users to now mix their left and right sound profiles.
Since we knew we were going to link the hearing aids soon, we had to design a way for our users to now mix their left and right sound profiles.
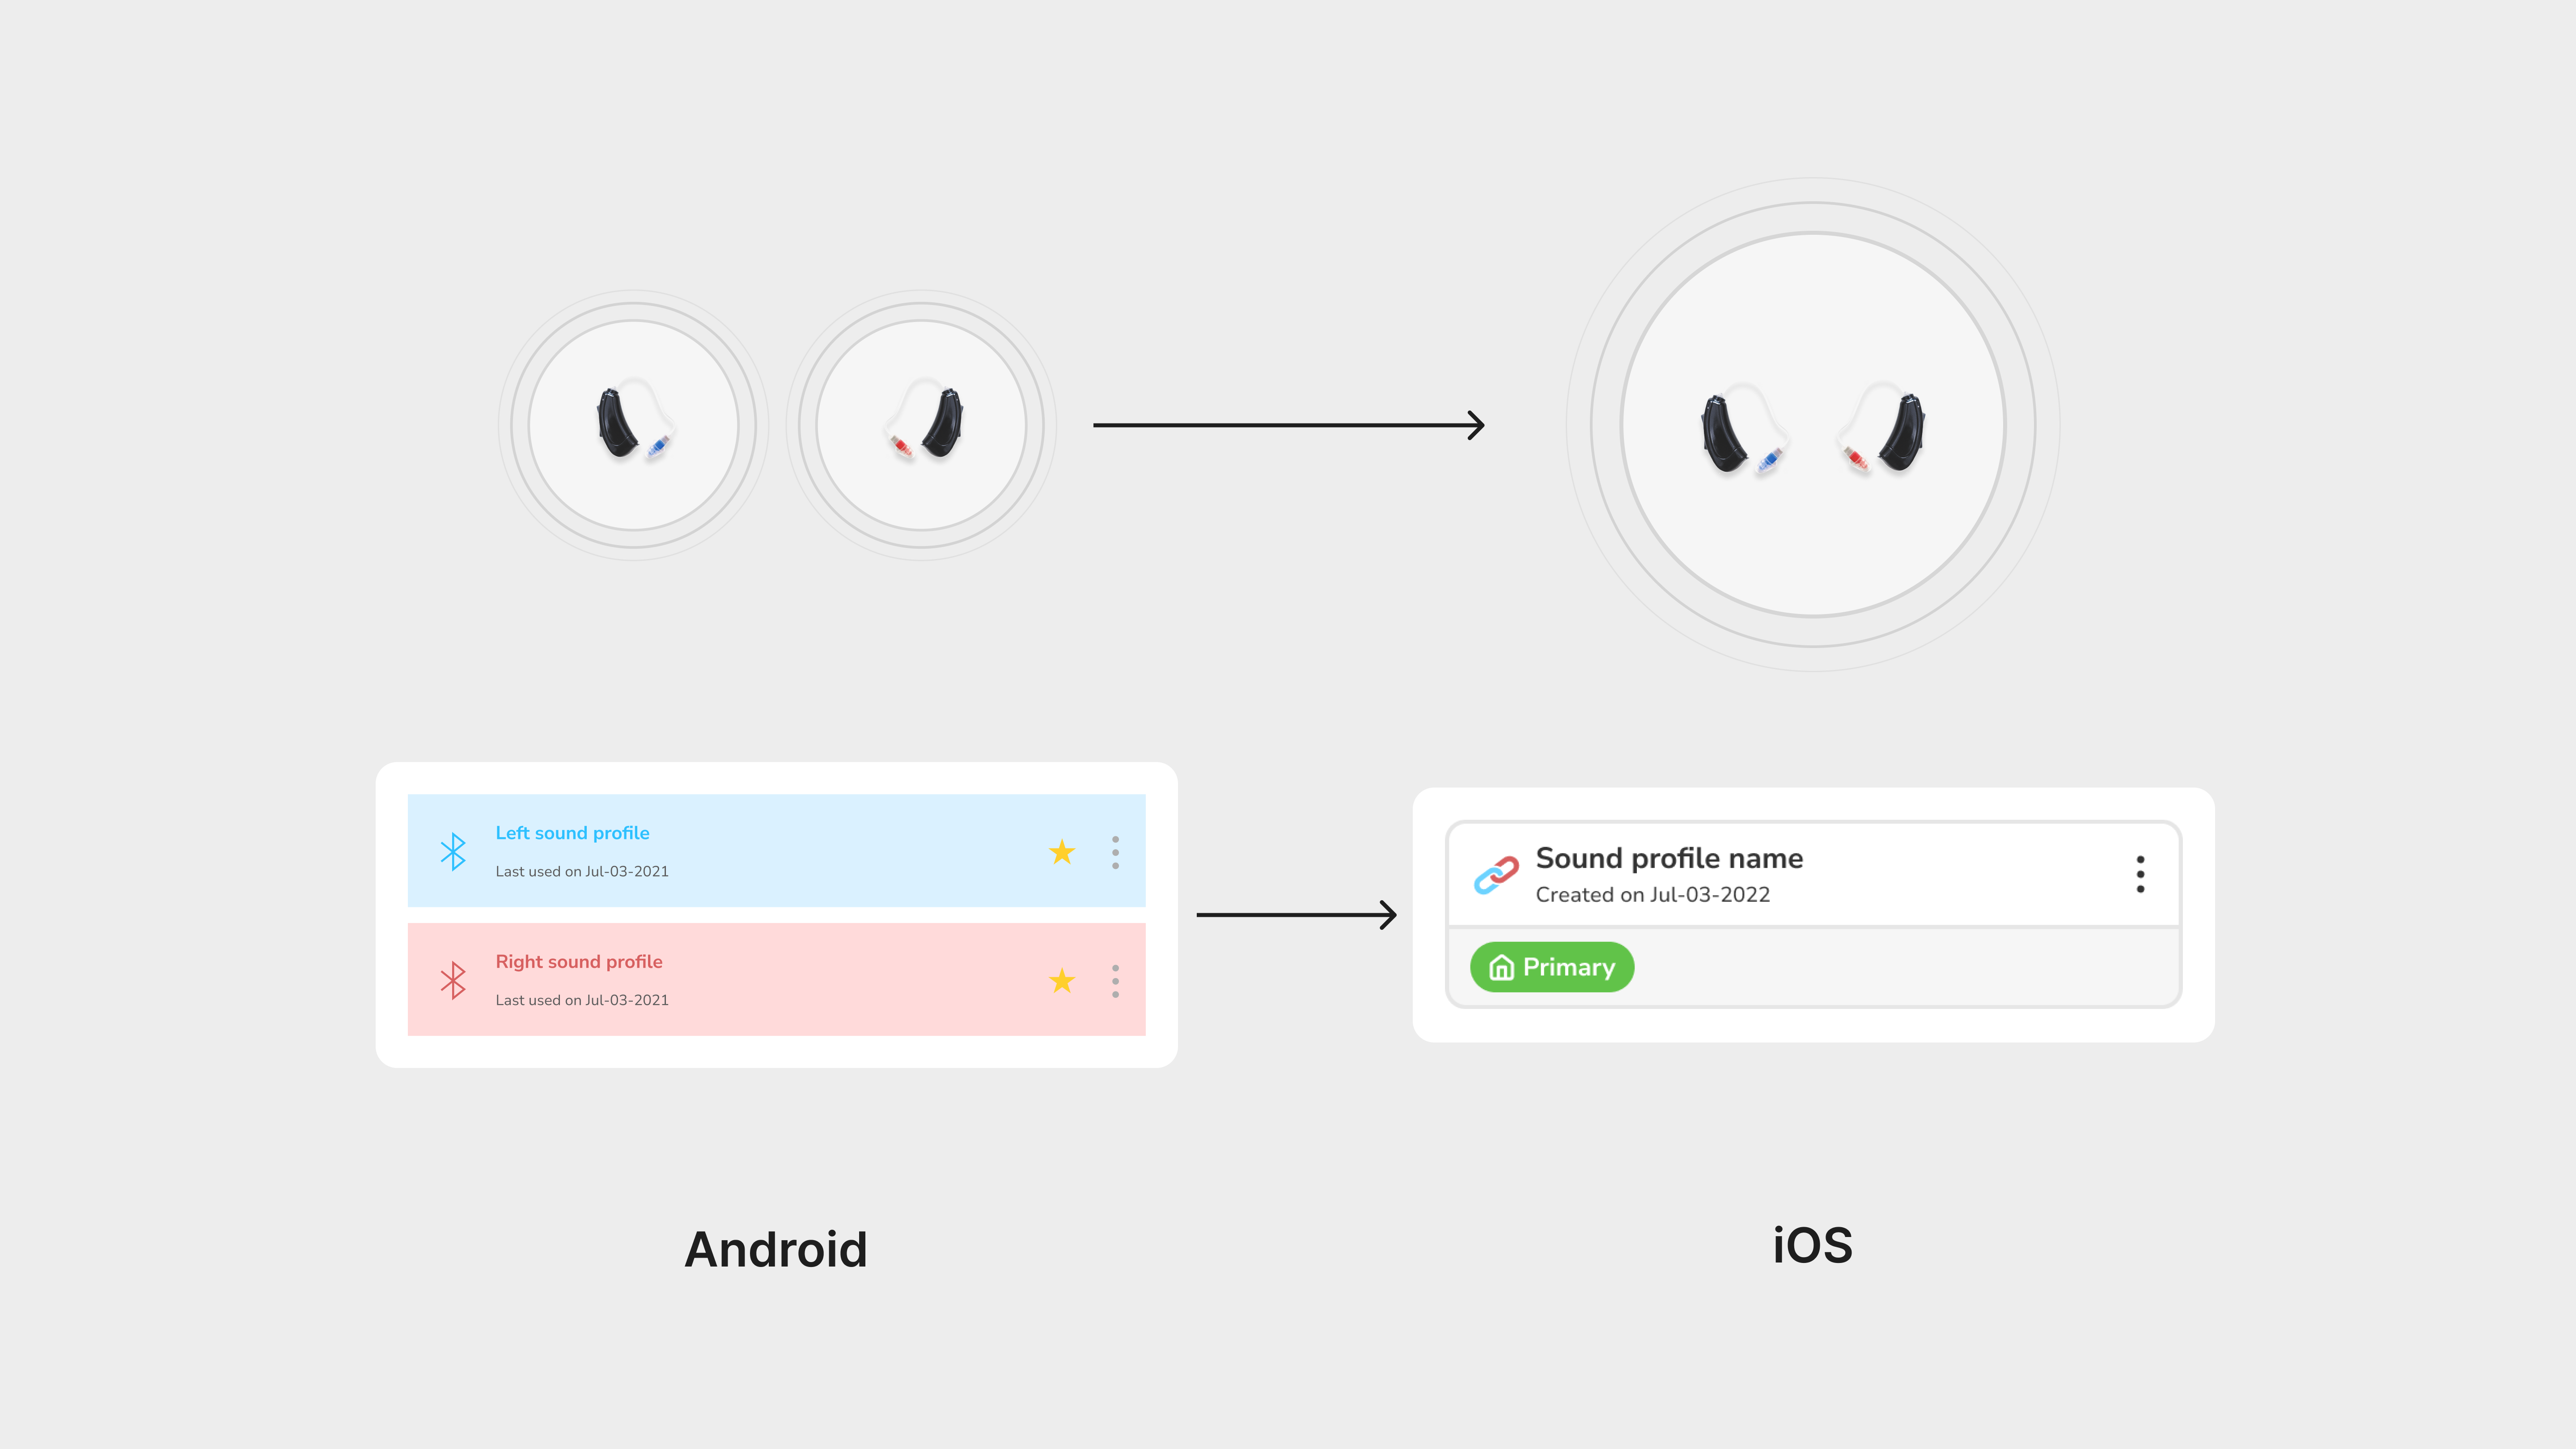
This change also affected our design! Loading a linked sound profile to your hearing aids was as easy as a tap now. Before, users had to connect and load each left and right sound profile separately.
The problem (cont.)
Our goal was to create a system in order for users to be able to mix left and right sound profiles to create their ultimate sound profile.
Visualising the problem
How a sound profile is created and works
Below is how our user flow for how the app changed before linking and after linking. This was helpful to figure out how to design for the sound profiles to be able to be modular.
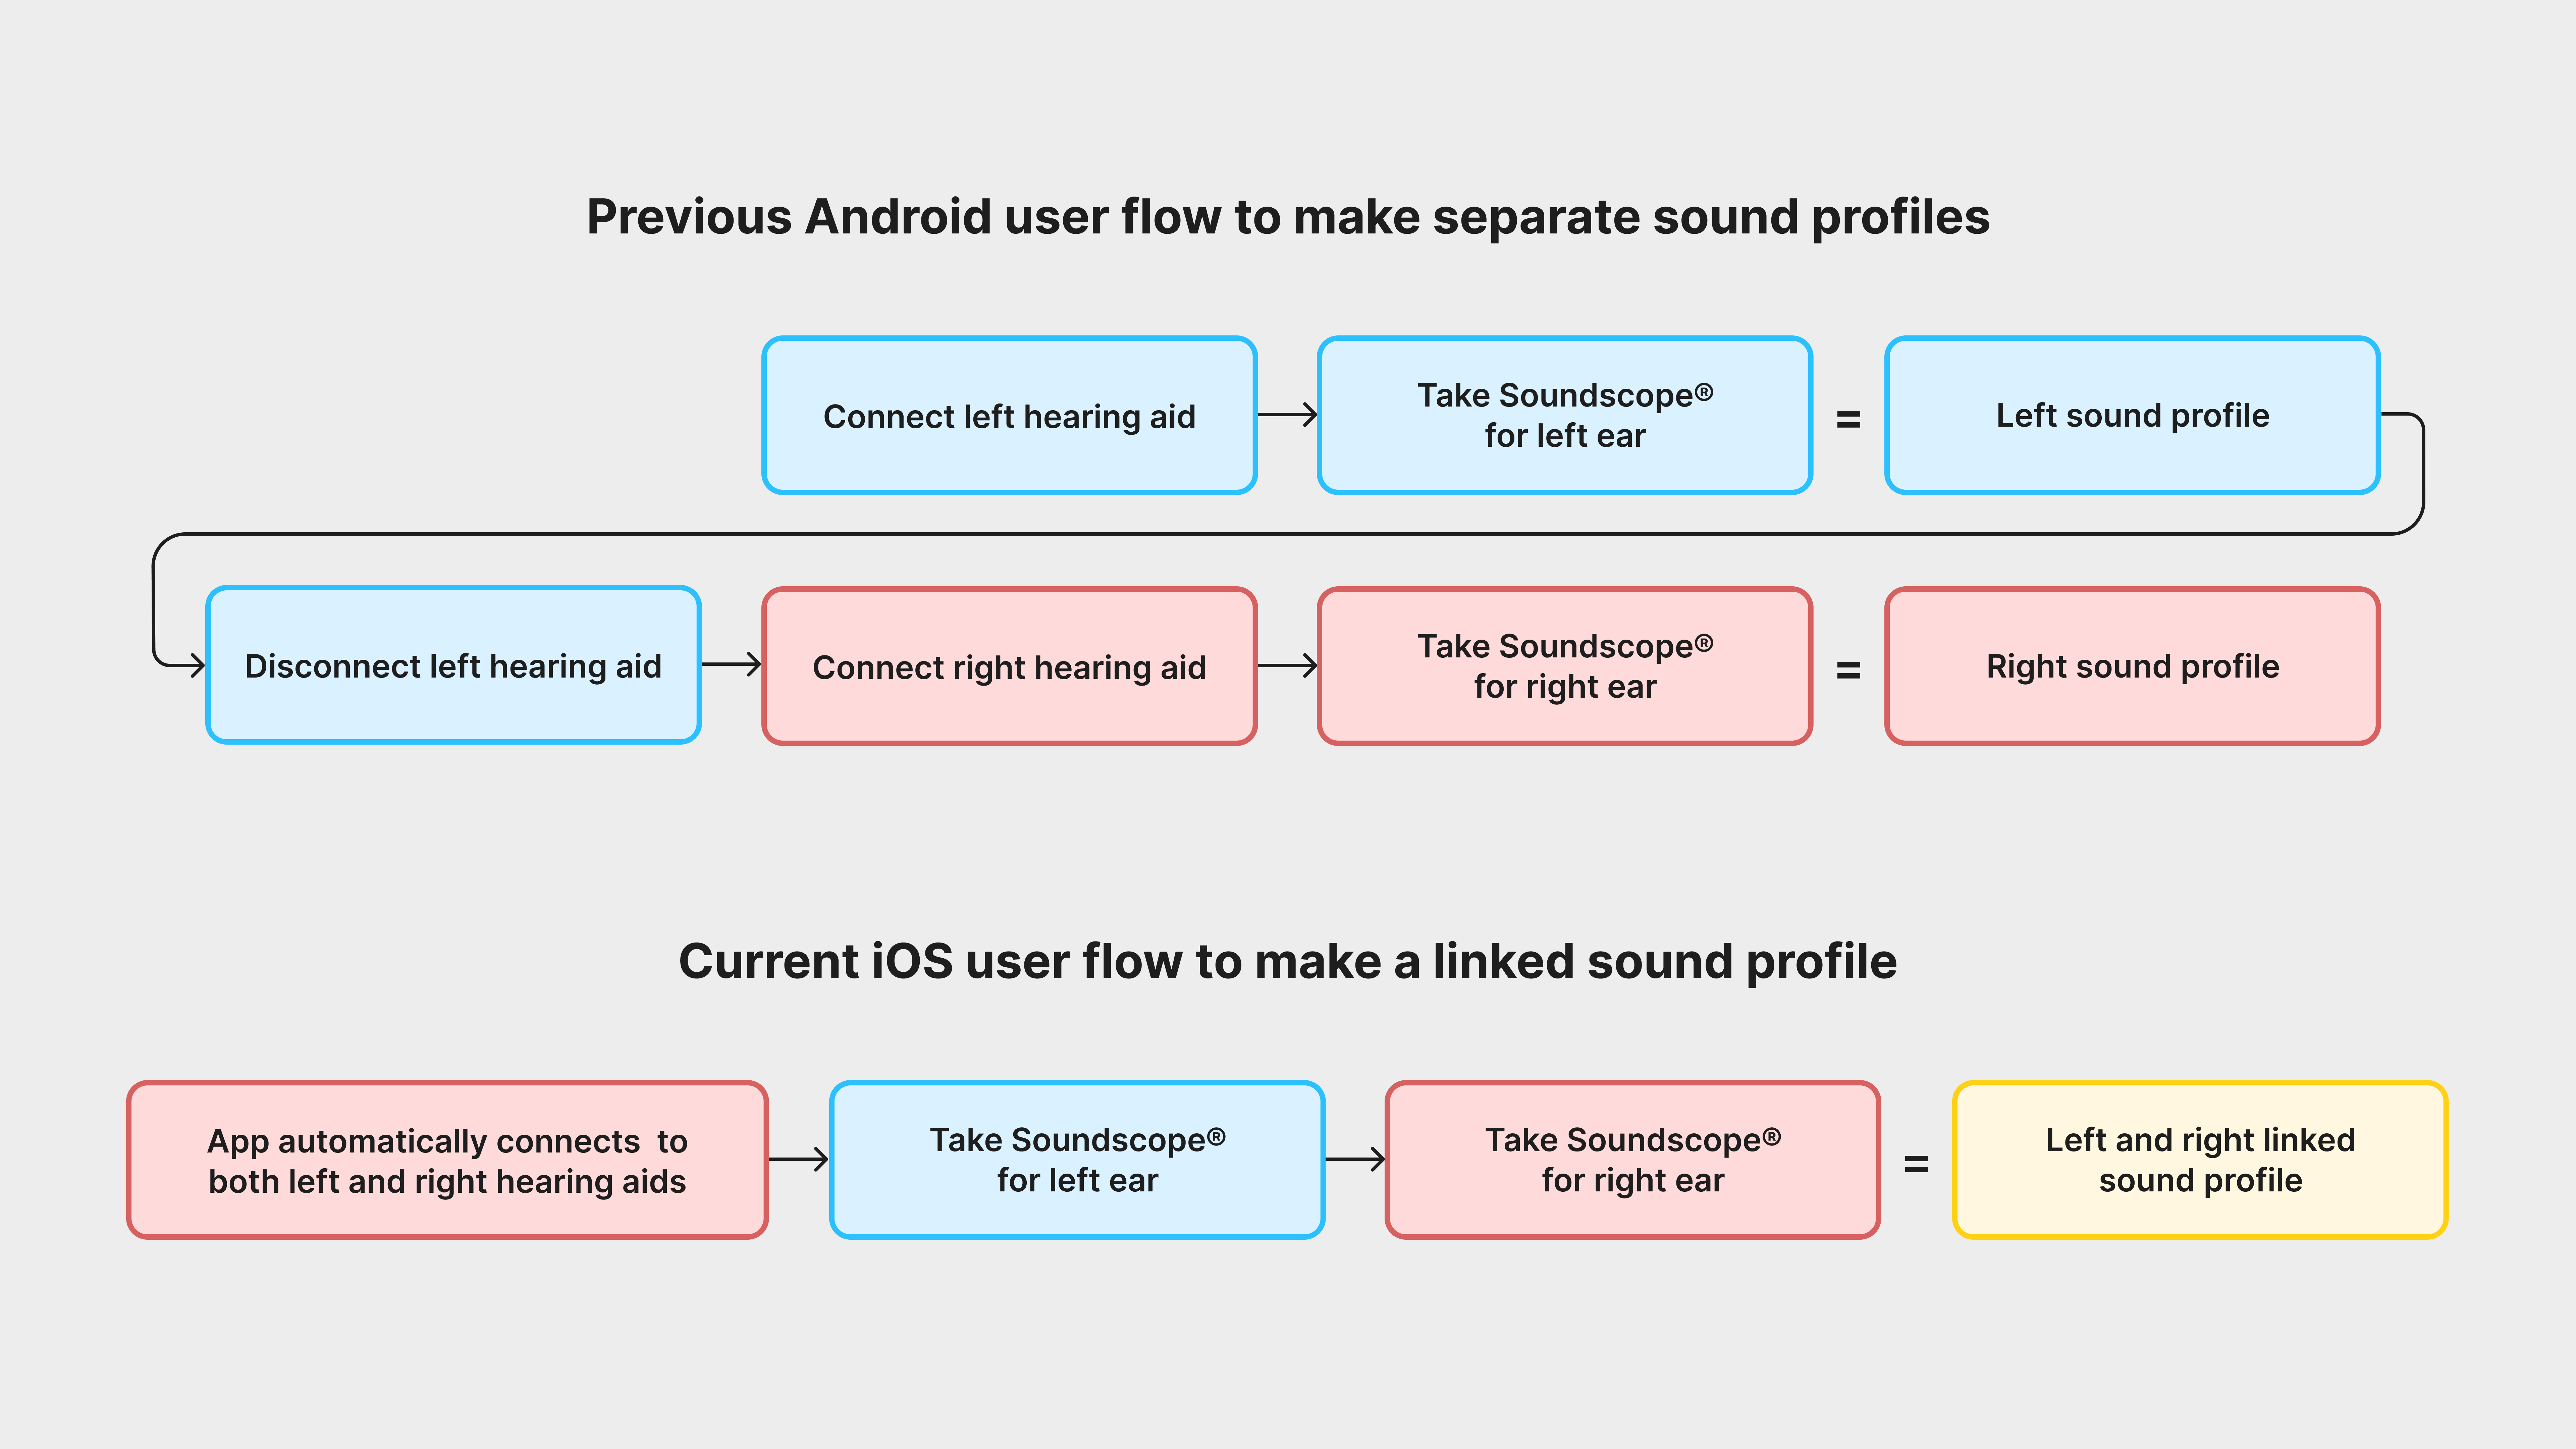
Linking the left and right sound profile was much more efficient.
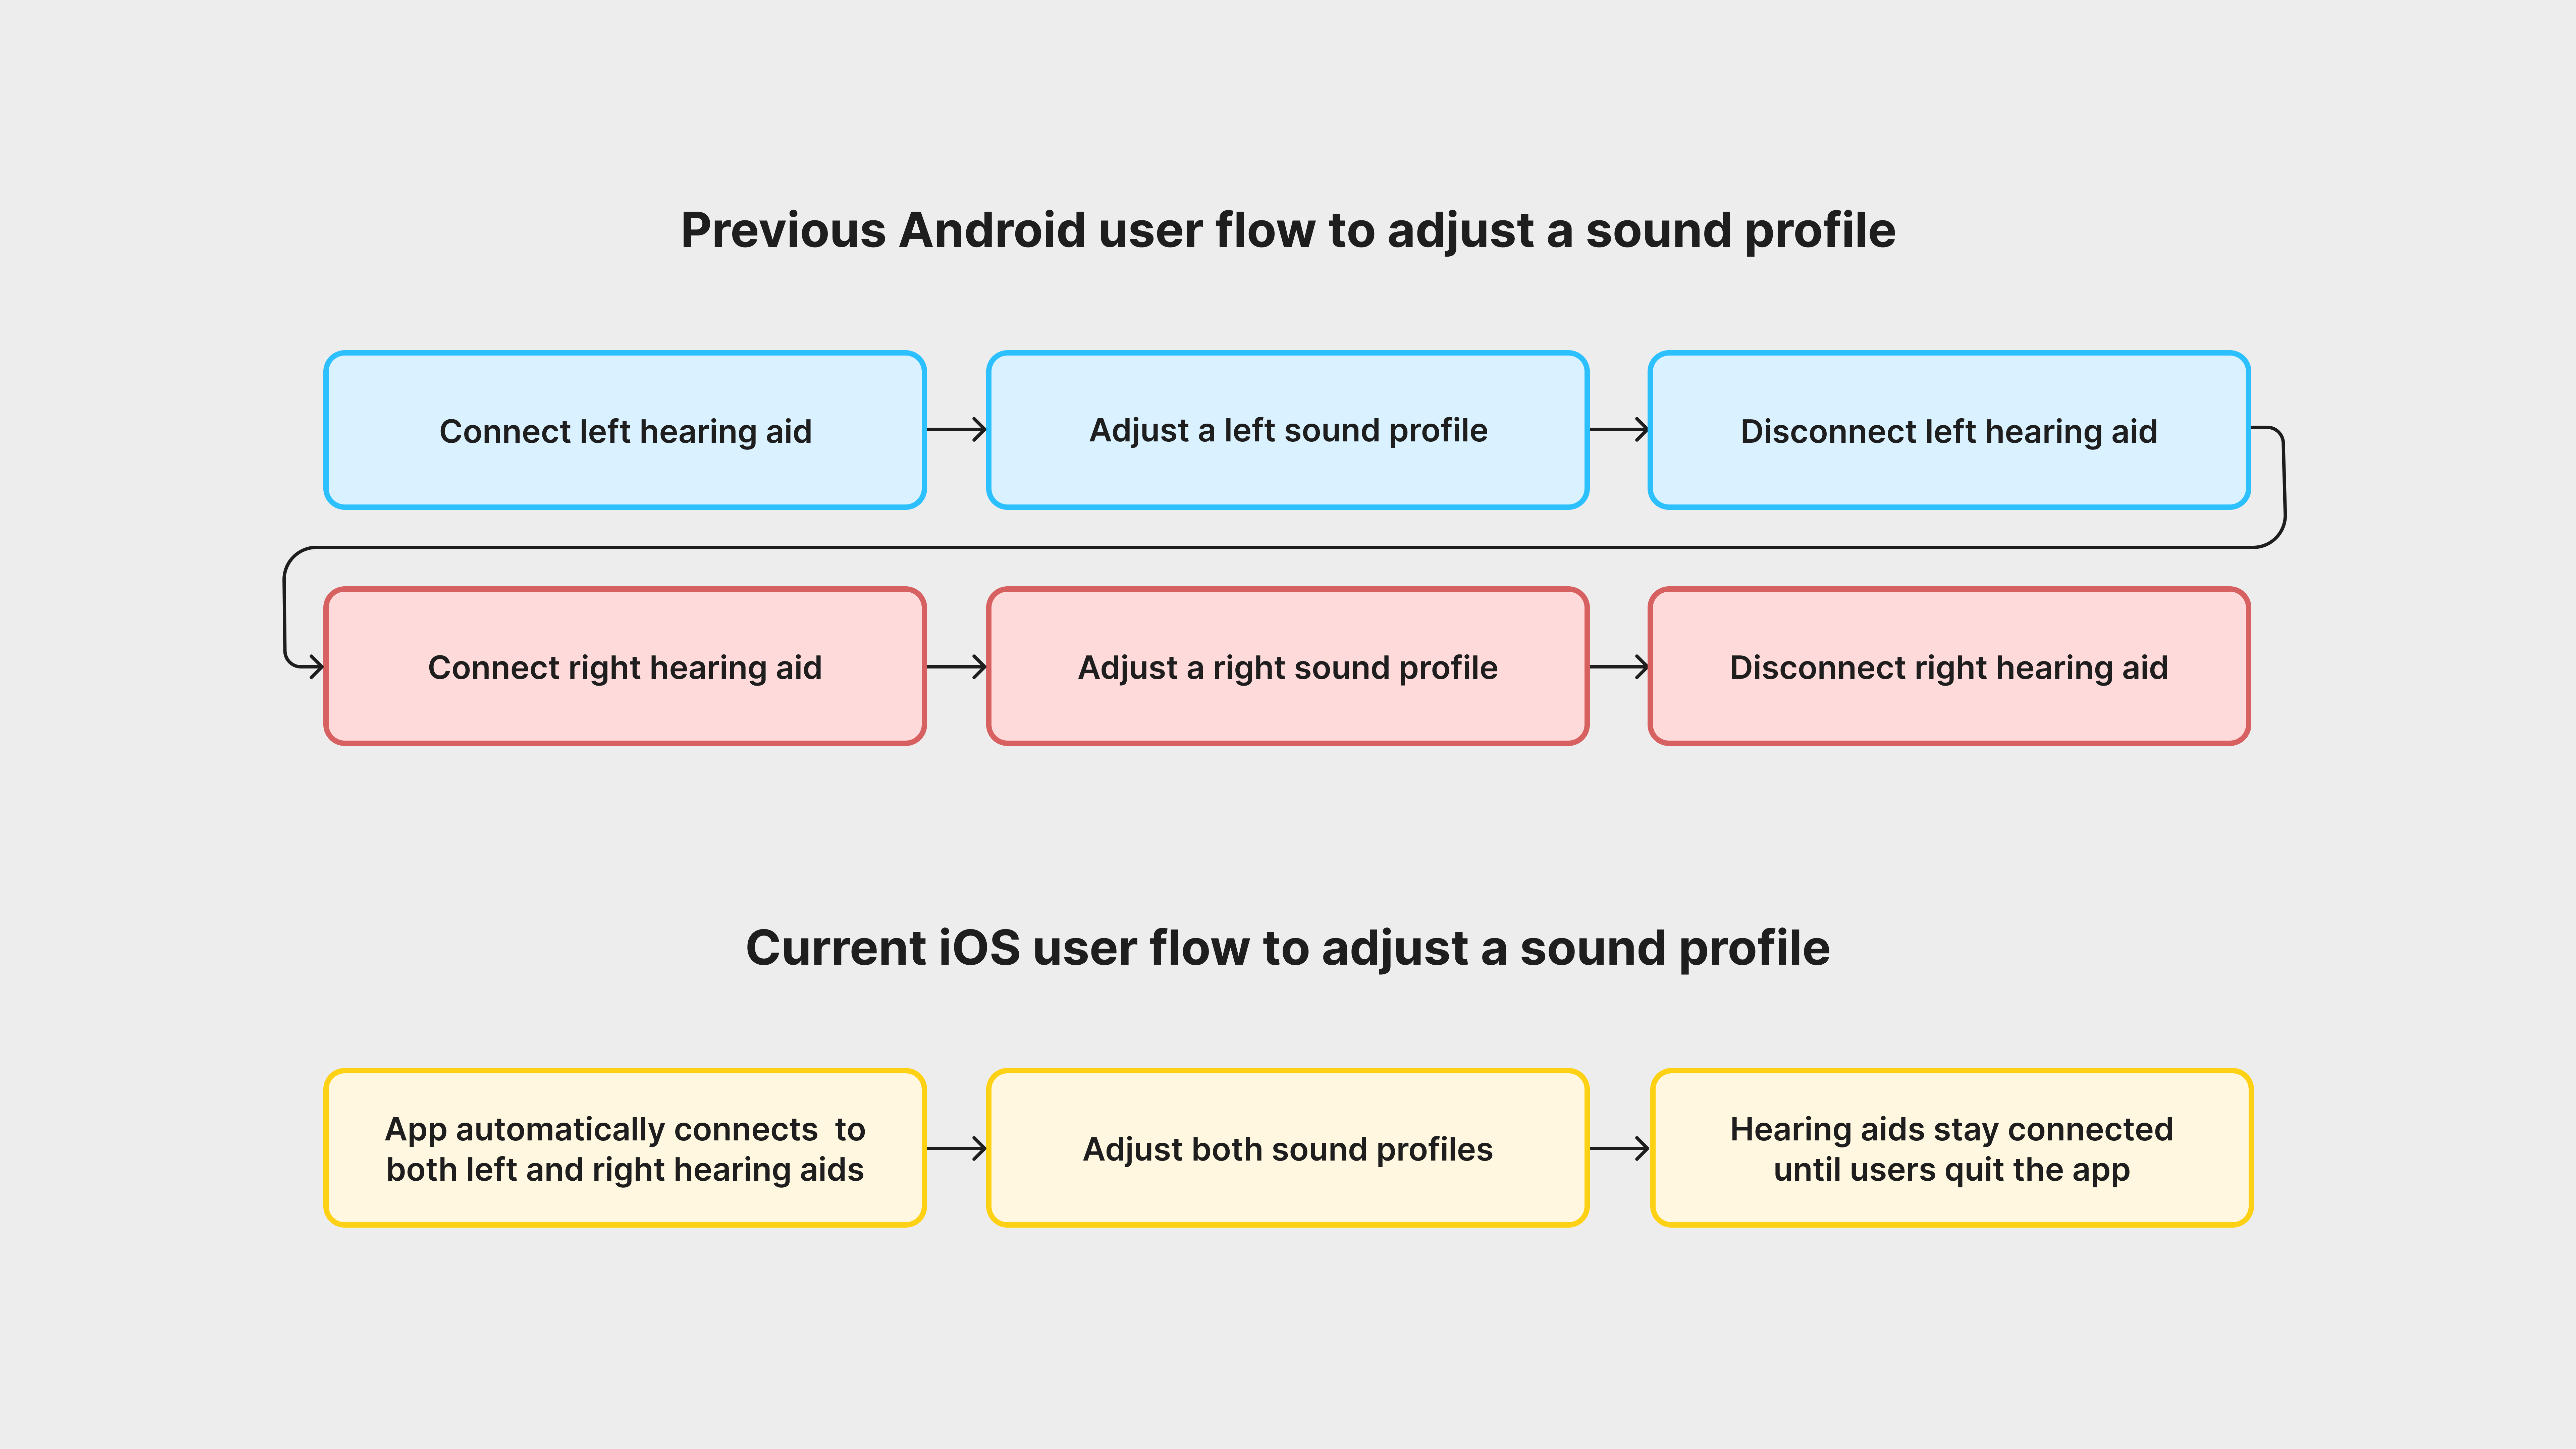
This was the flow to adjust a sound profile. It was frustrating to have to disconnect and reconnect.
How a sound profile is created and works (cont.)
With these updated user flows for linked sound profiles, users have can make three variations of linked sound profiles:
With this update, I made a visual of this concept to understand it better.
- Left sound profiles
- Right sound profiles
- Left and right sound profiles
With this update, I made a visual of this concept to understand it better.
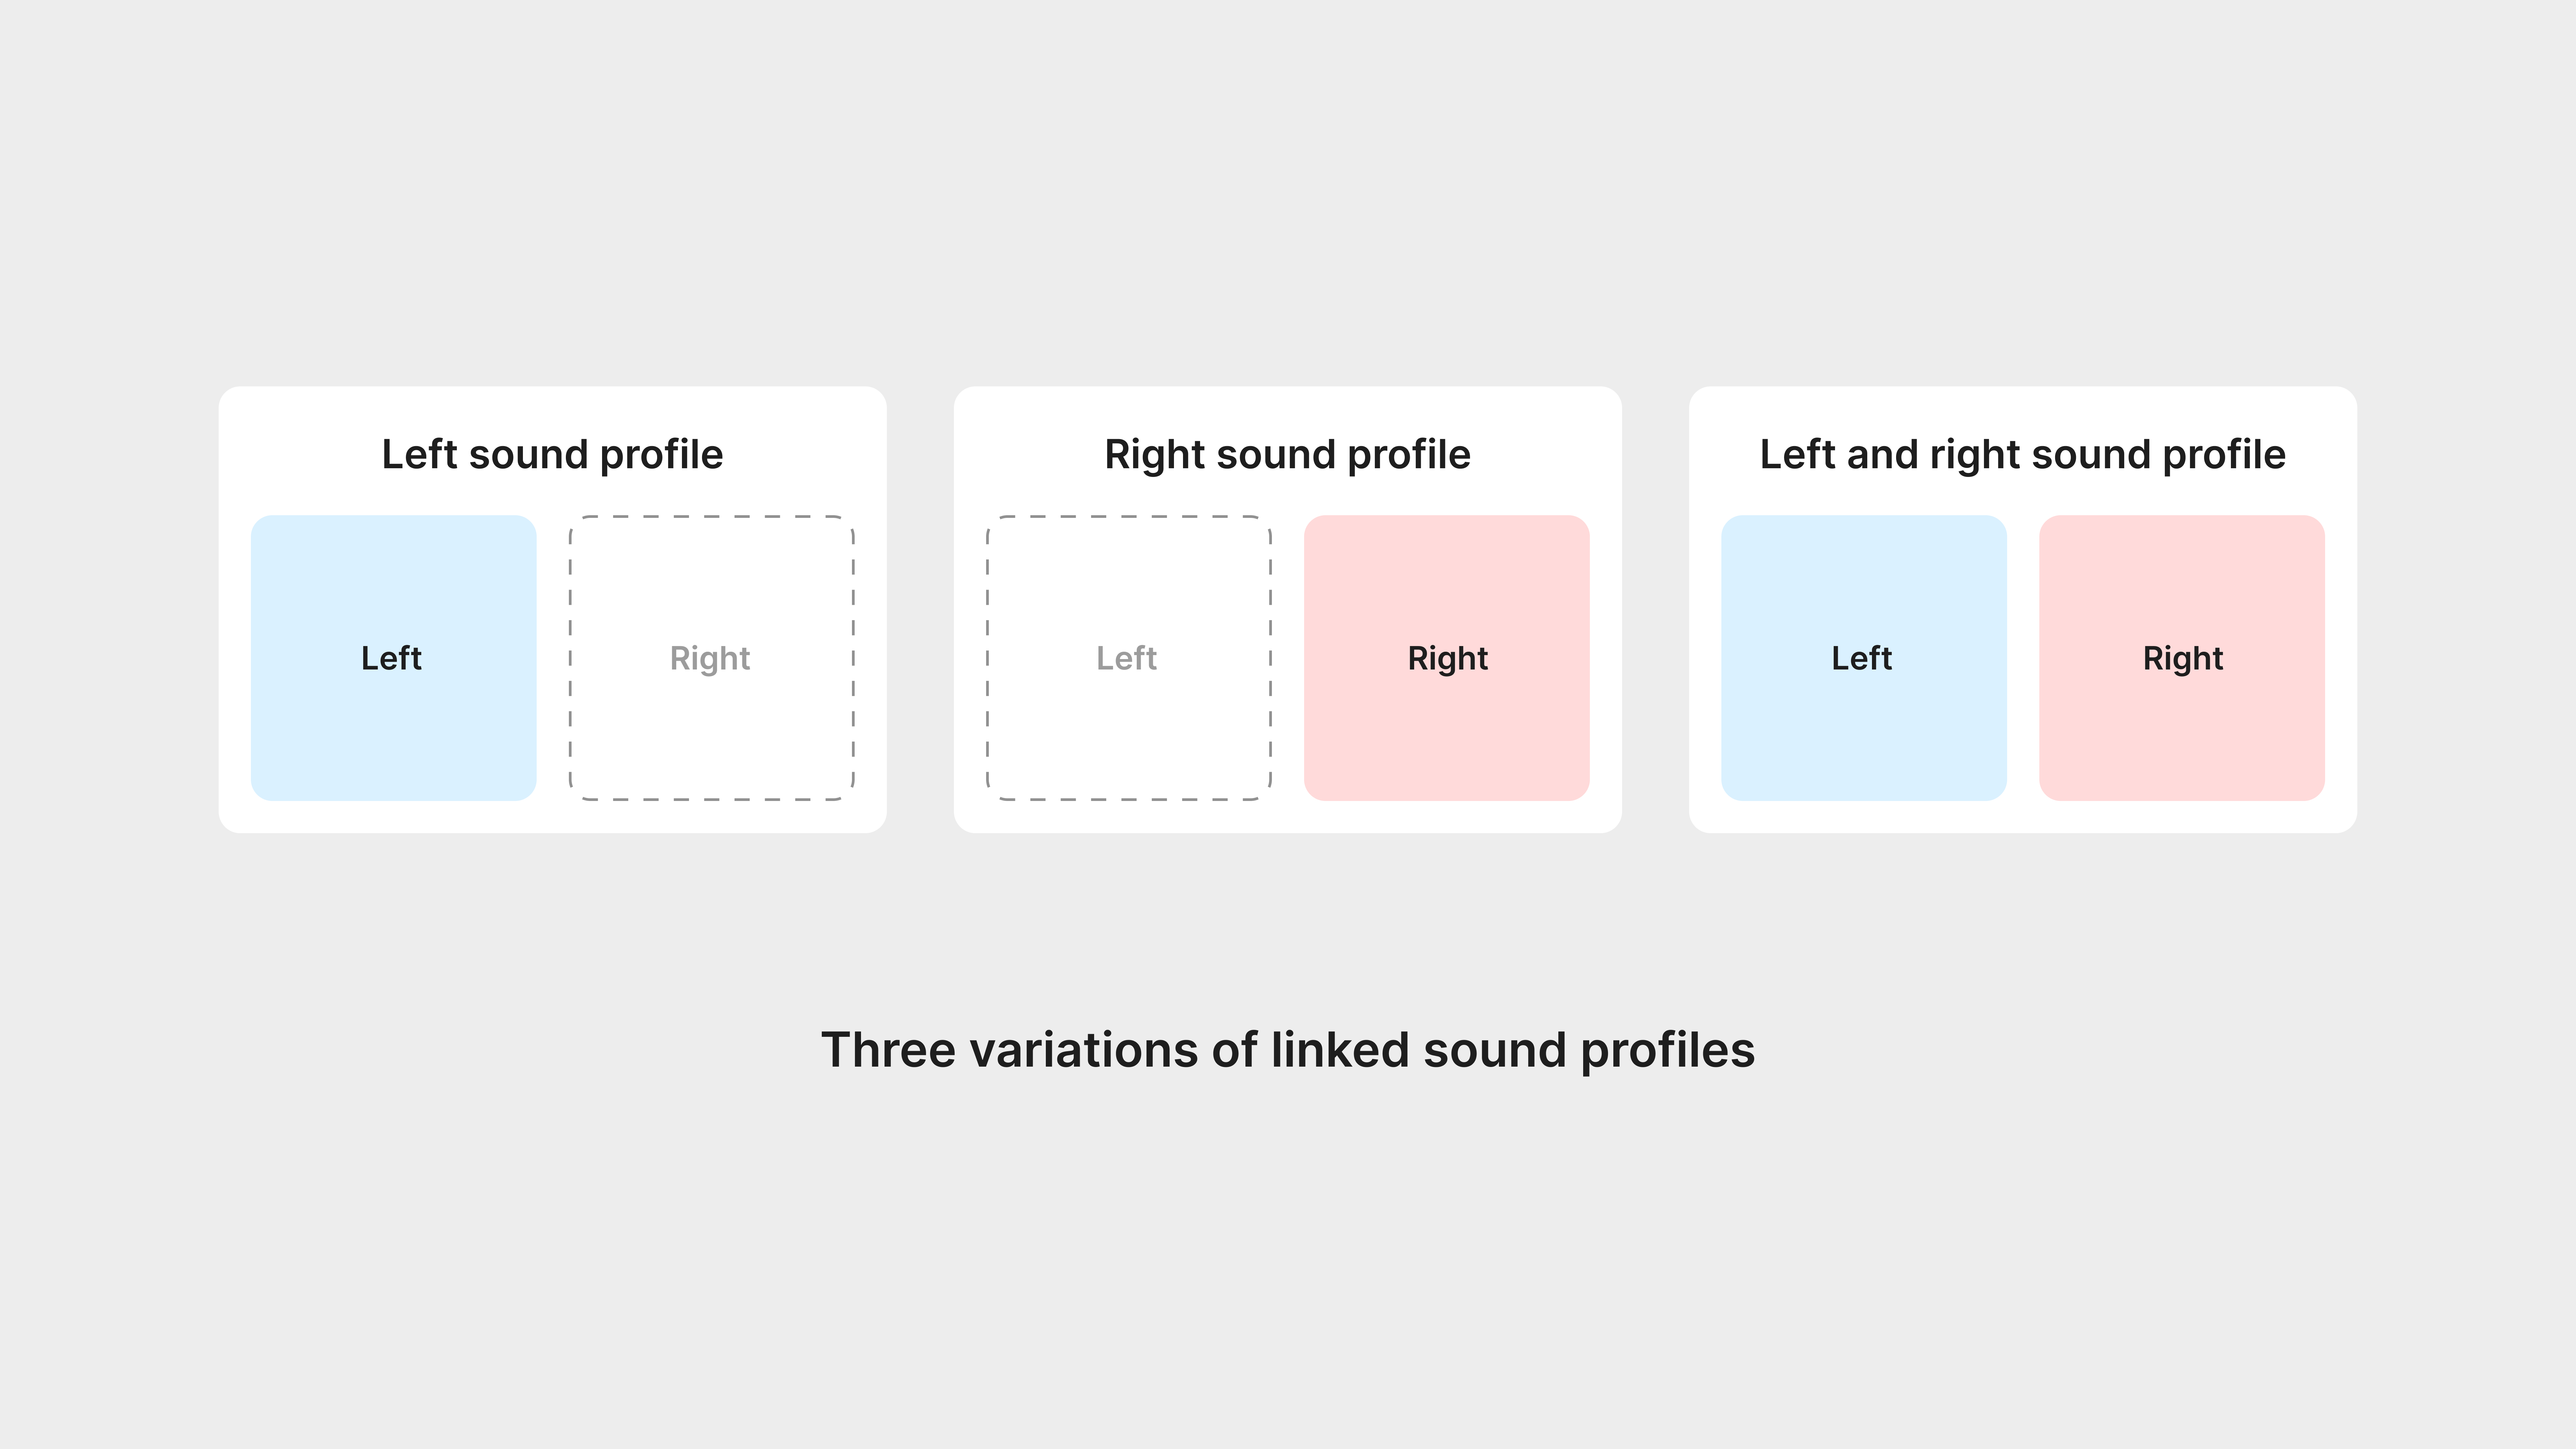
I first began by mapping out a visual of what this concept looks like, to understand. Basically, a user who uses one hearing aid only has one option of a left or right sound profile, but a user who uses both hearing aid has three variations of linked sound profiles!
How a sound profile is created and works (cont.)
With these three variations of linked sound profiles, we were posed with the main question of: What if our users made a left sound profile, but wanted to link it to a different right sound profile?
Brainstorming + creating user flow
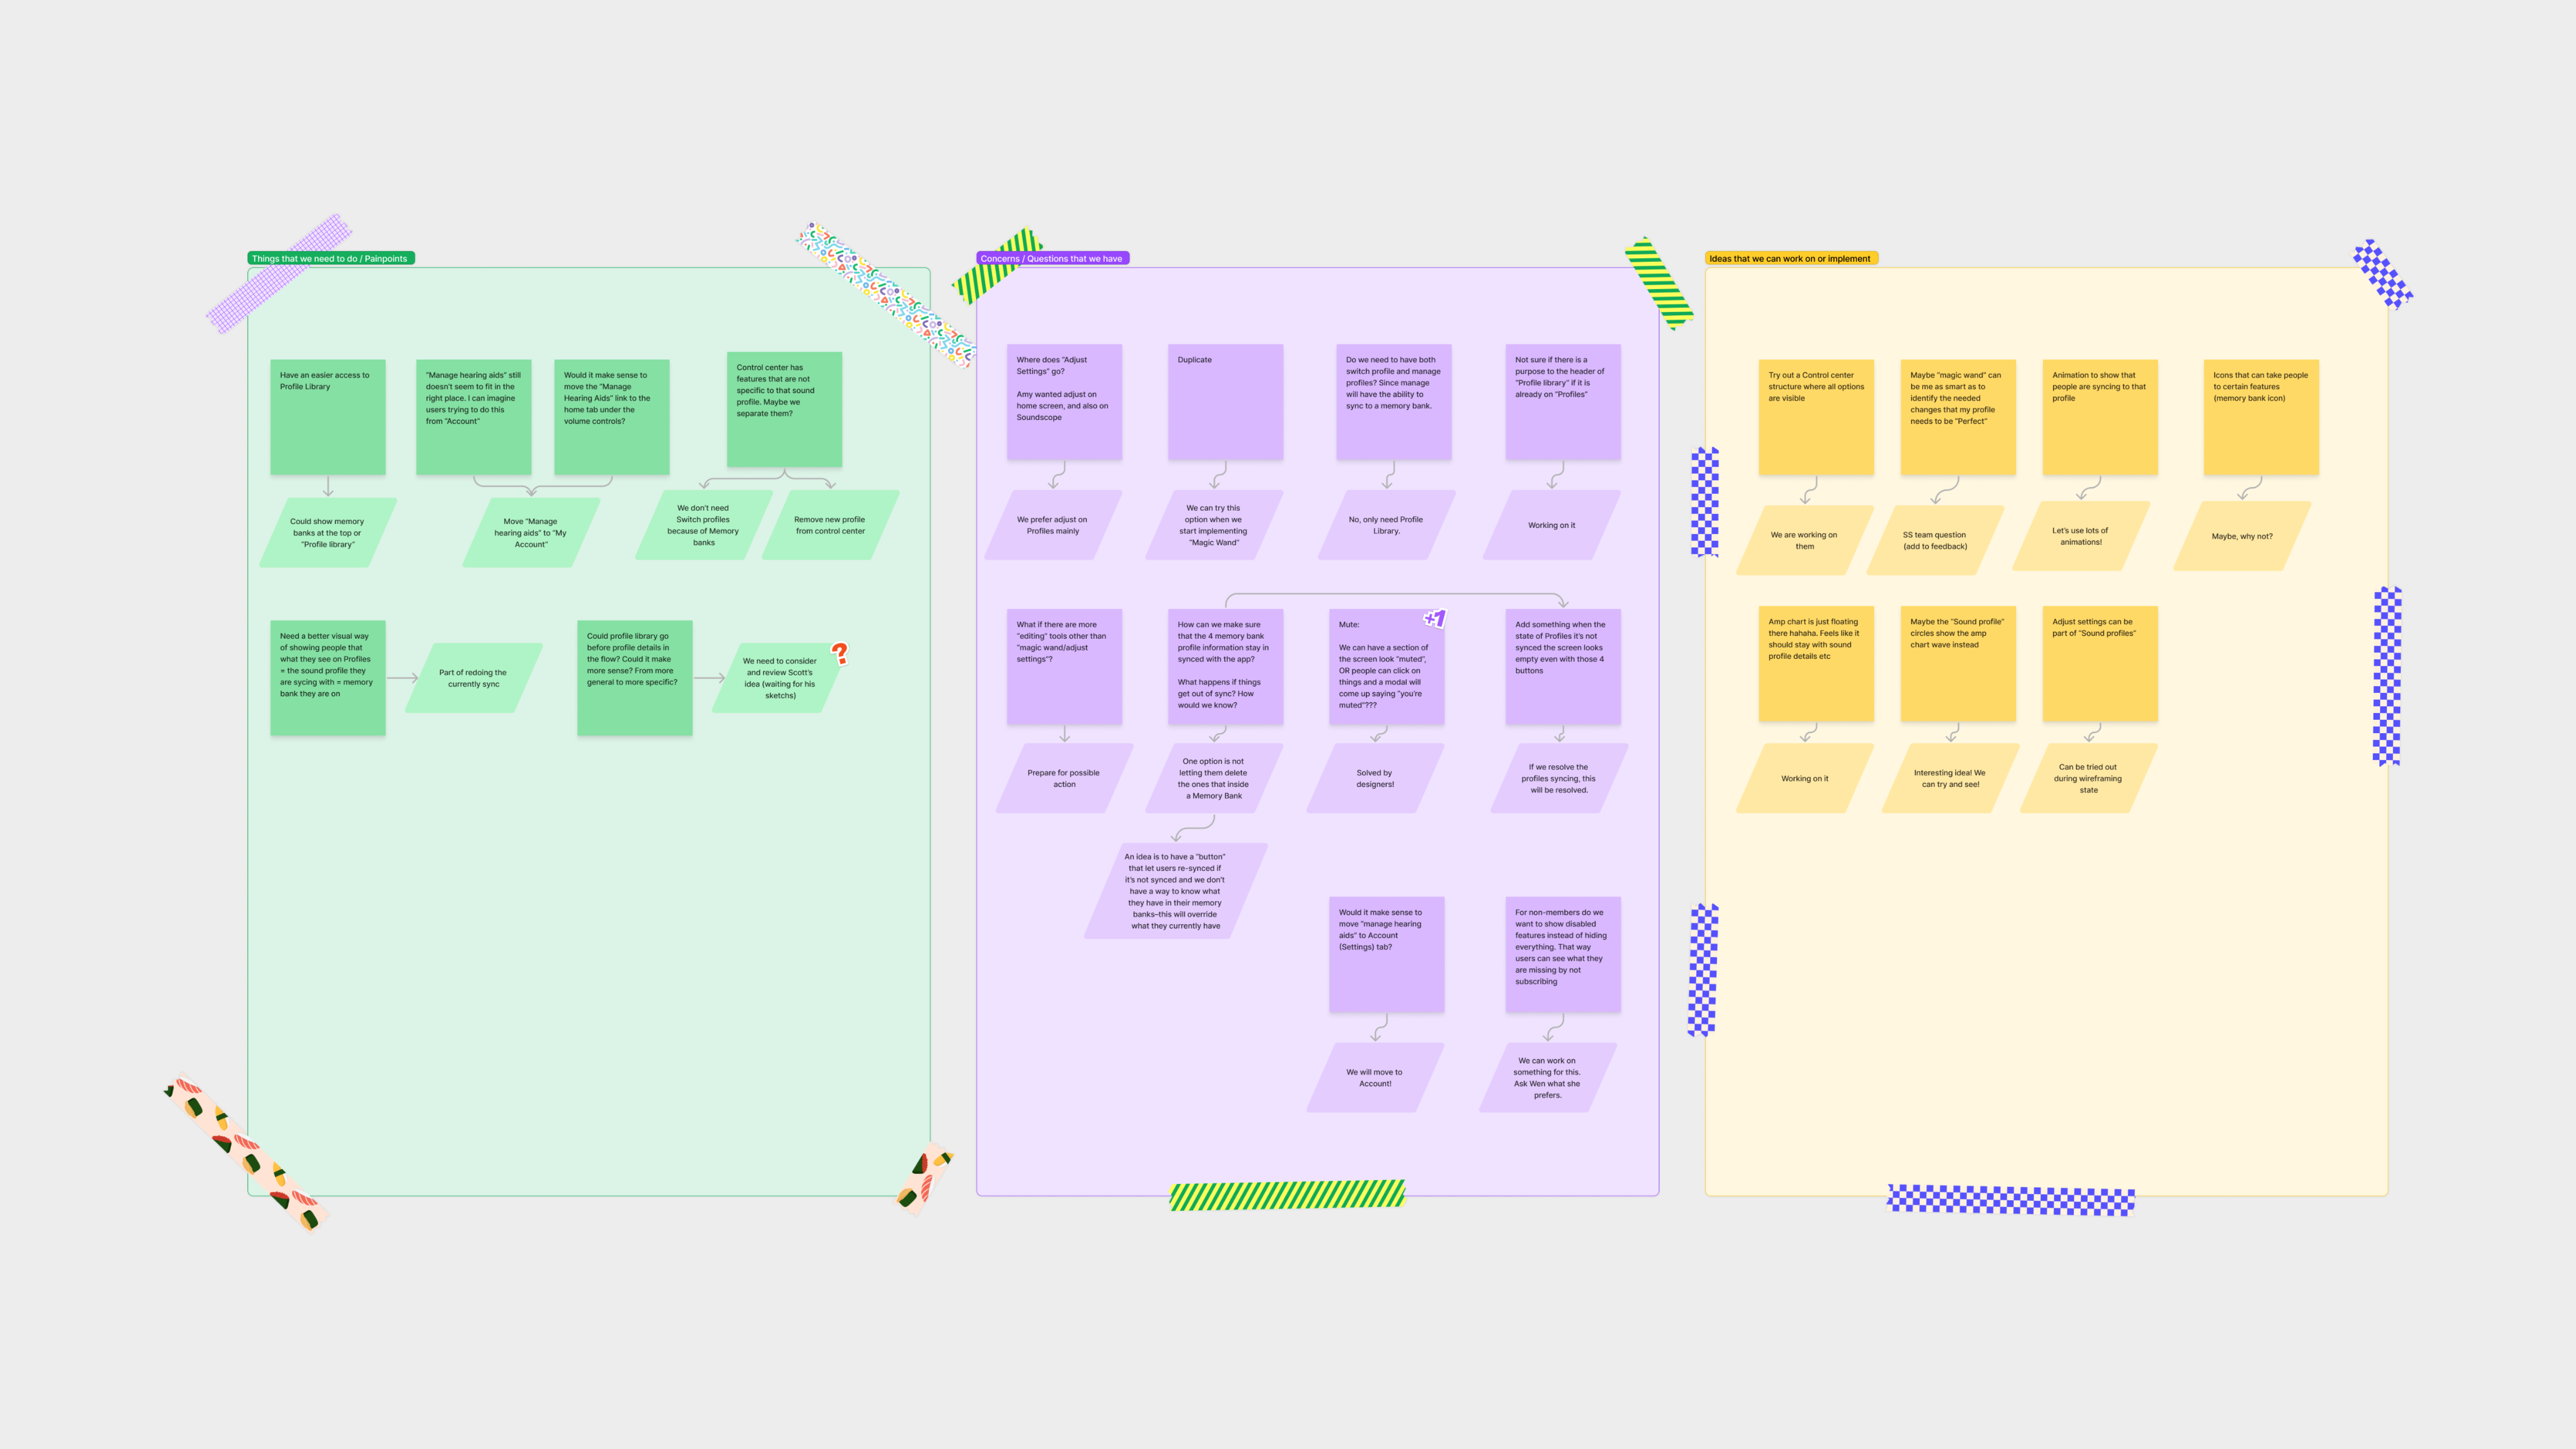
Brainstorming
We decided we needed a way for users to mix sound profiles, so that they could come up with the ultimate sound profile that suit their needs, instead of re-taking Soundscope® until they made a perfect set.
I led a brainstorming session with the iOS team to figure out what concerns we had, ideas, and action items. It was helpful to understand our limits before going into design.
I led a brainstorming session with the iOS team to figure out what concerns we had, ideas, and action items. It was helpful to understand our limits before going into design.
Edge case #1
We mainly came across two edge cases that we needed to work through before solidifying this feature.
Let’s say our users were in a rush and could only create a right sound profile. They have a few action items to finish that sound profile to make it fully linked.
I created visuals of both #1 and #2 to explain how this would work. I already knew we would be working with a design that featured the left and right sound profile, so visualising this was simple.
Let’s say our users were in a rush and could only create a right sound profile. They have a few action items to finish that sound profile to make it fully linked.
-
Create a left sound profile by taking Soundscope®.
- Add a left sound profile from a different sound profile.
I created visuals of both #1 and #2 to explain how this would work. I already knew we would be working with a design that featured the left and right sound profile, so visualising this was simple.
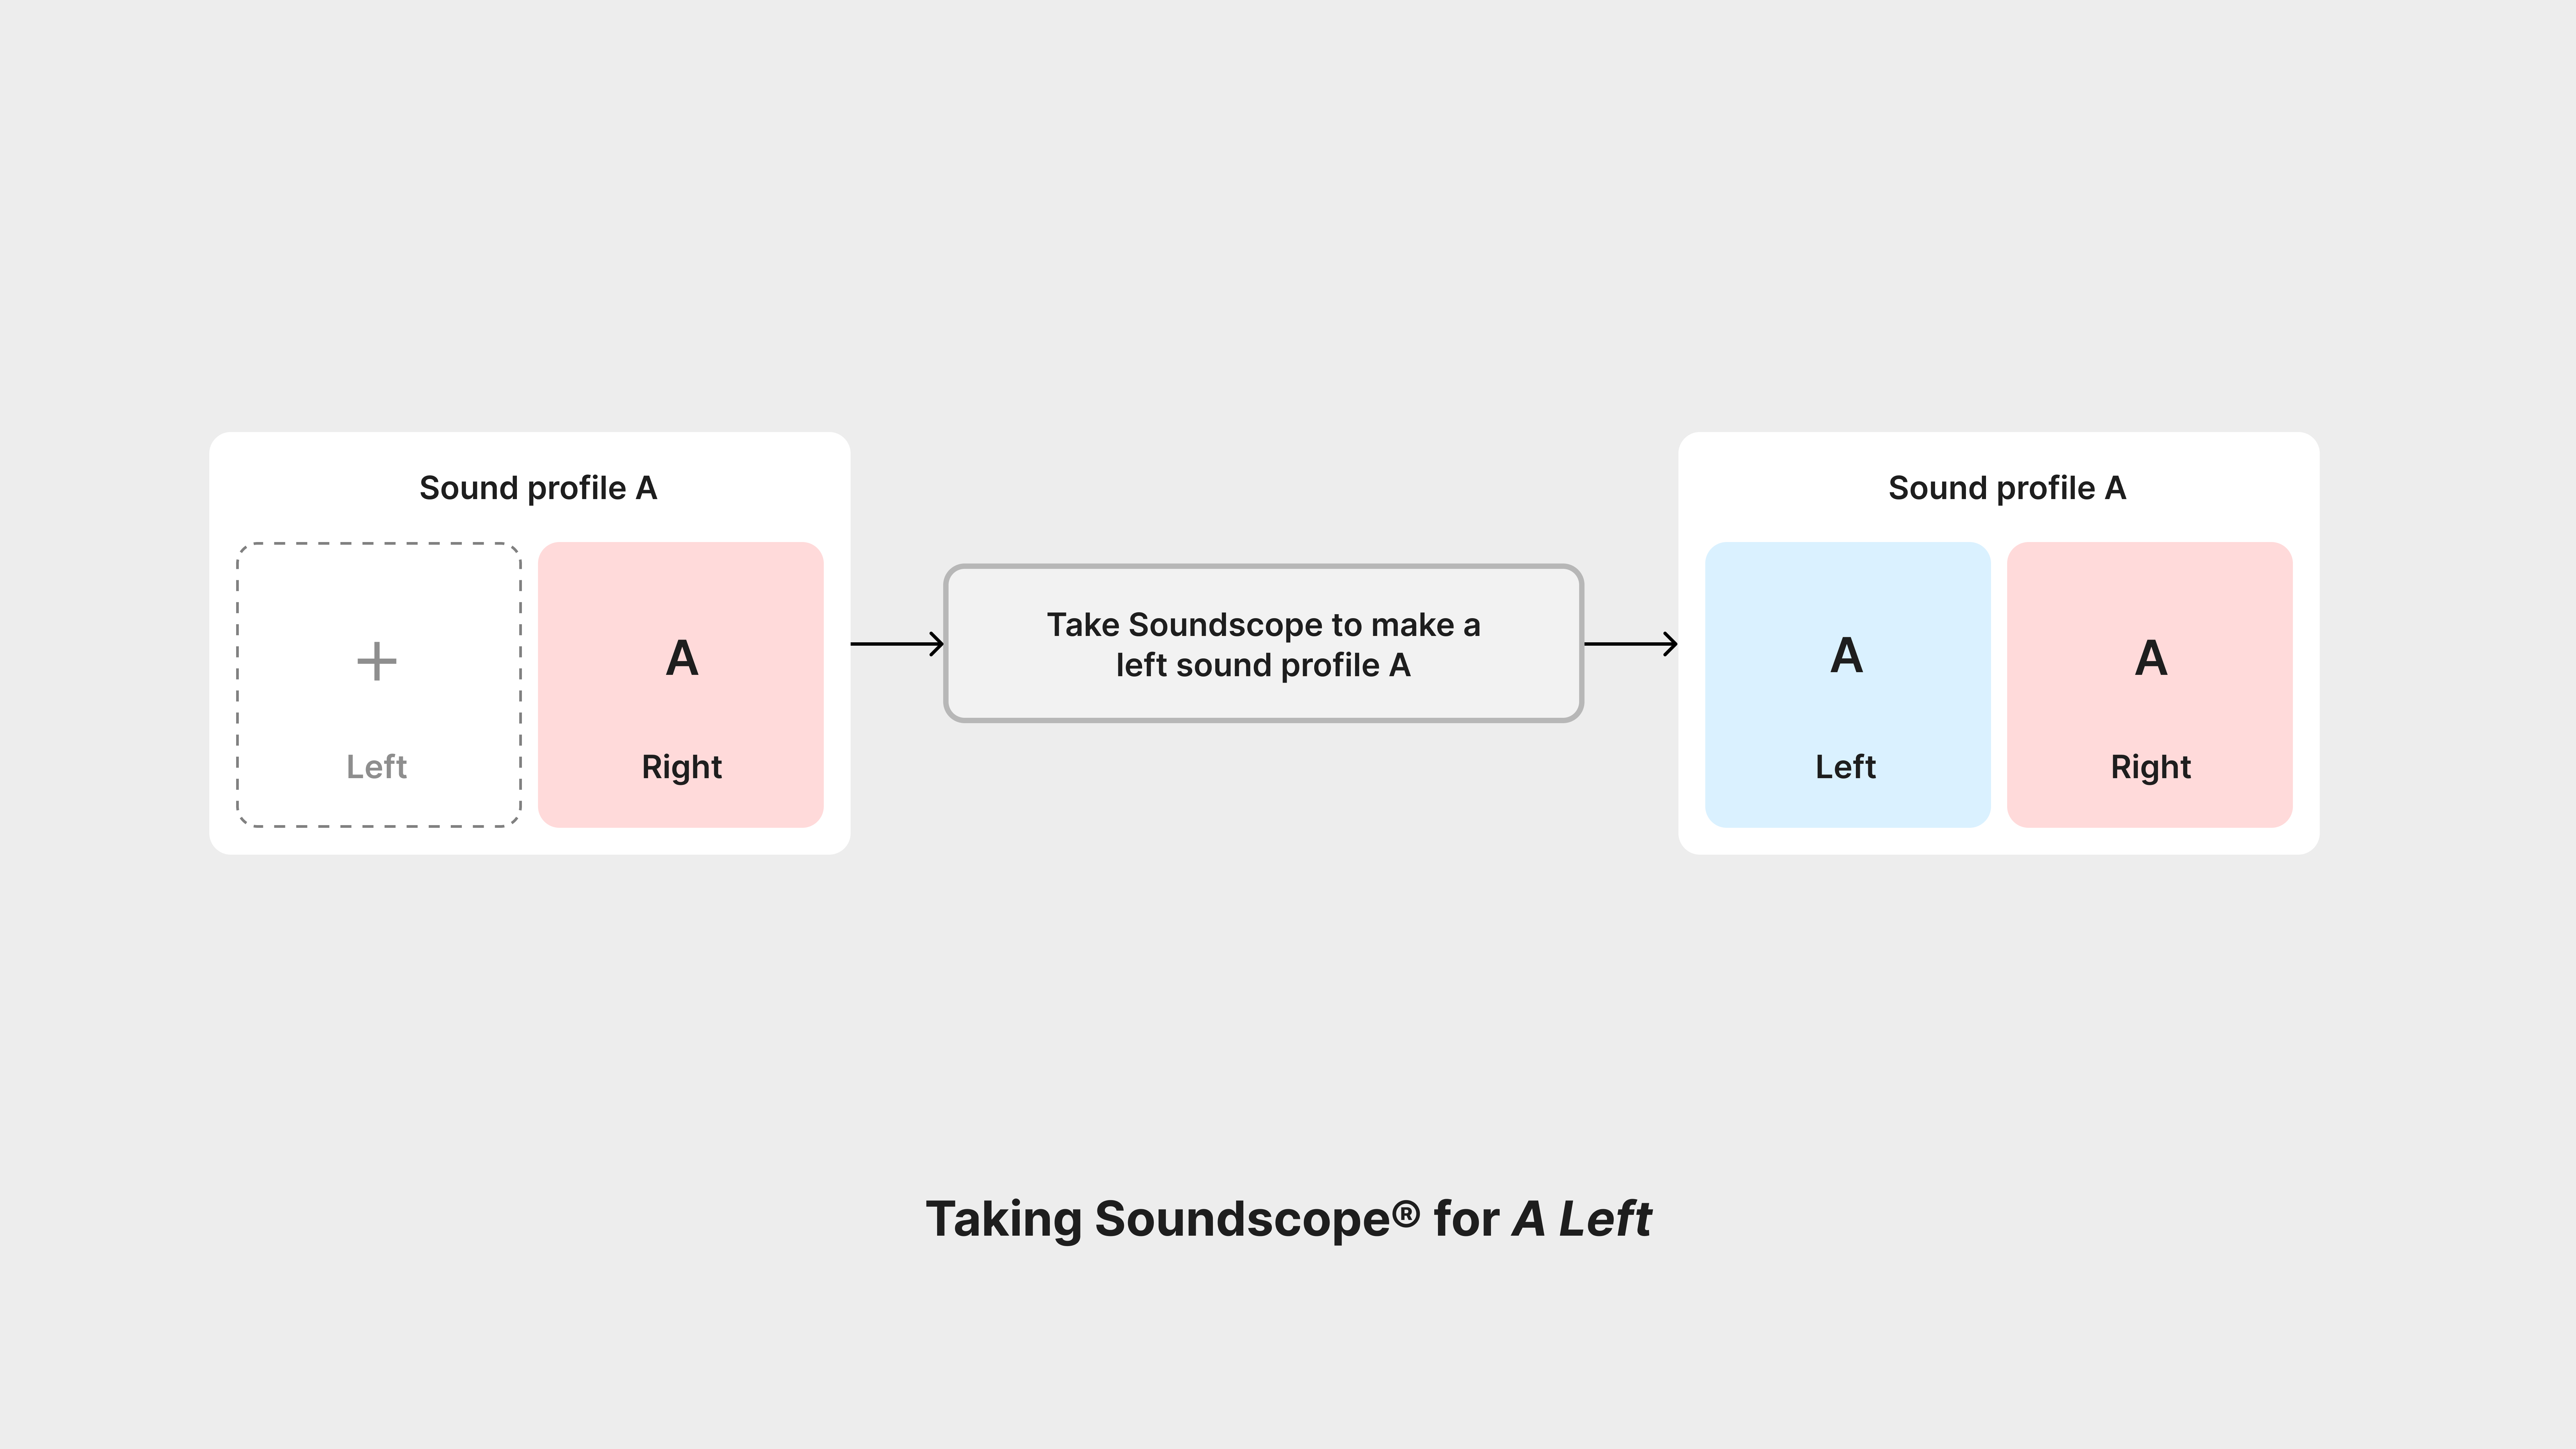
You can simply take Soundscope® to complete your linked sound profile!
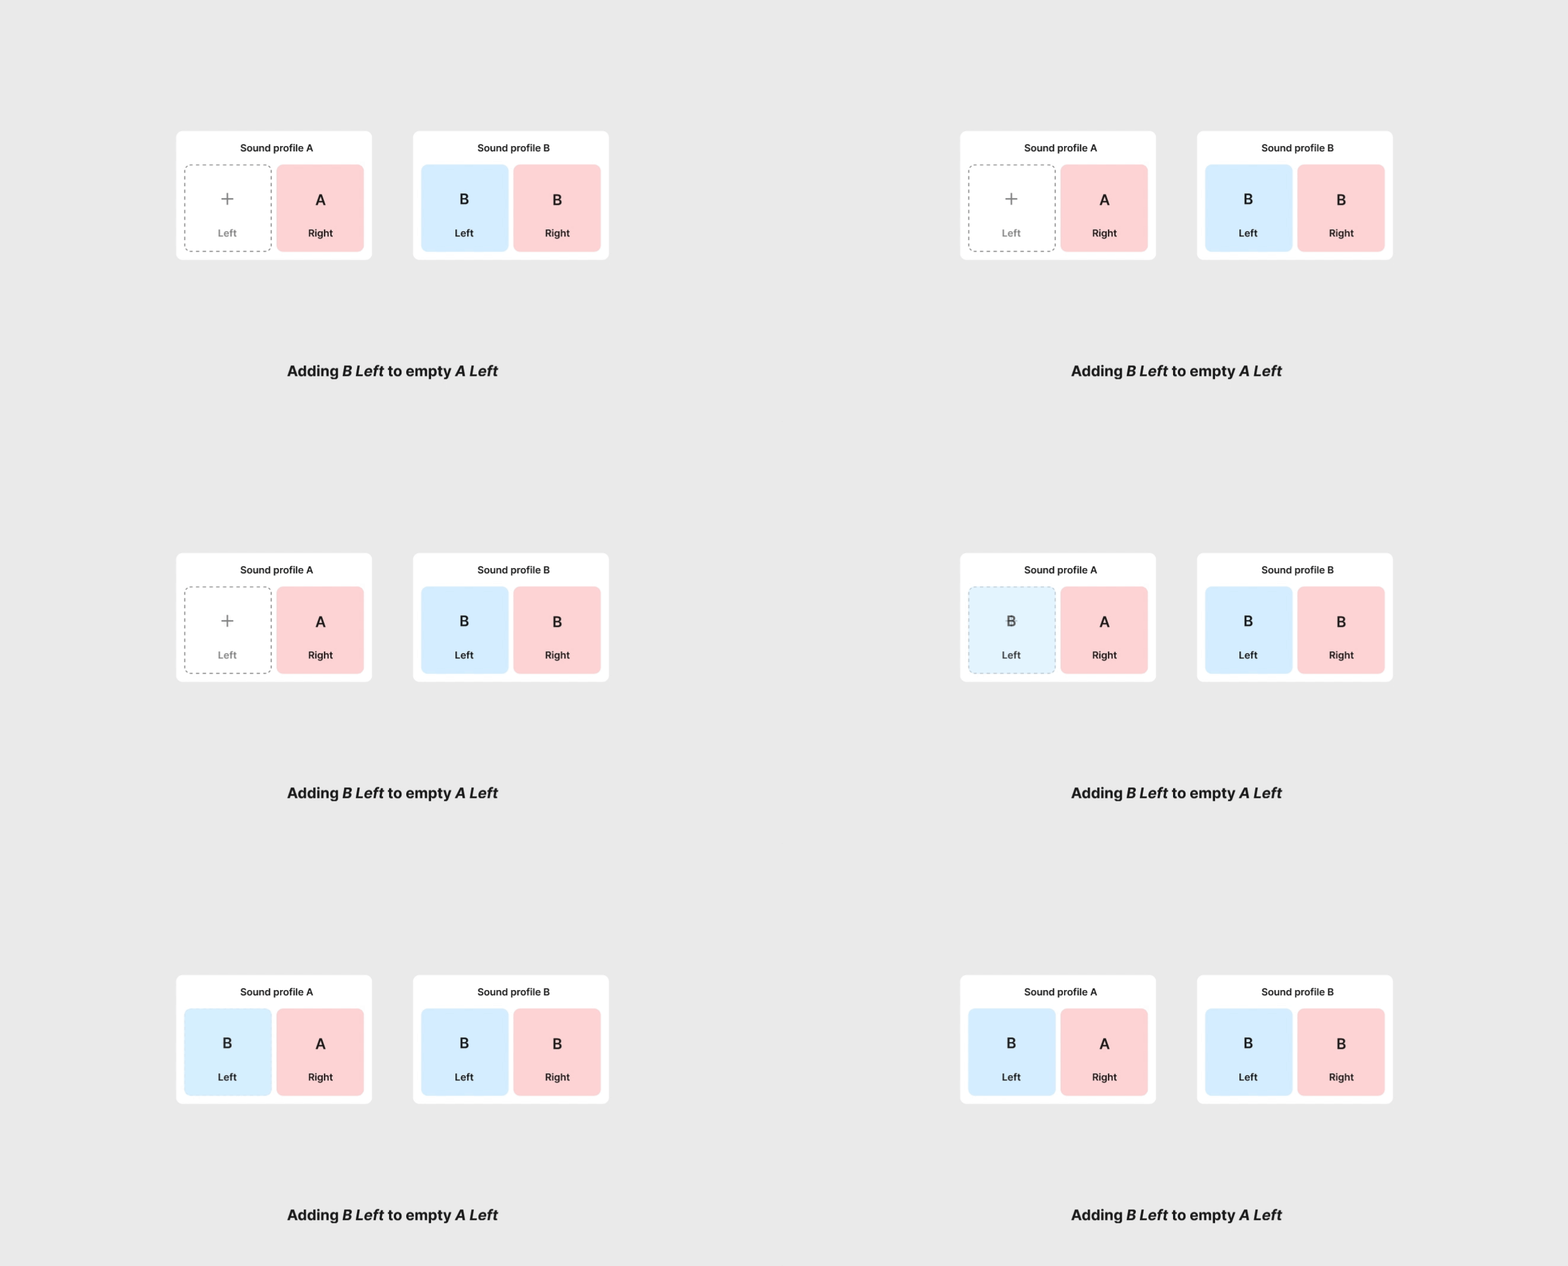
Adding B Left to empty A Left is just like copying and pasting!
Edge case #2
Let’s say our users made two sound profiles (both are finished for this example), and prefer a left and right sound profile, from the different sound profiles. They have a few action items from here:
- Delete a side, and from there they can do the action items from Edge Case #1 (Take Soundscope® or add a left sound profile from a different sound profile).
- Replace a side with a different side from another sound profile.
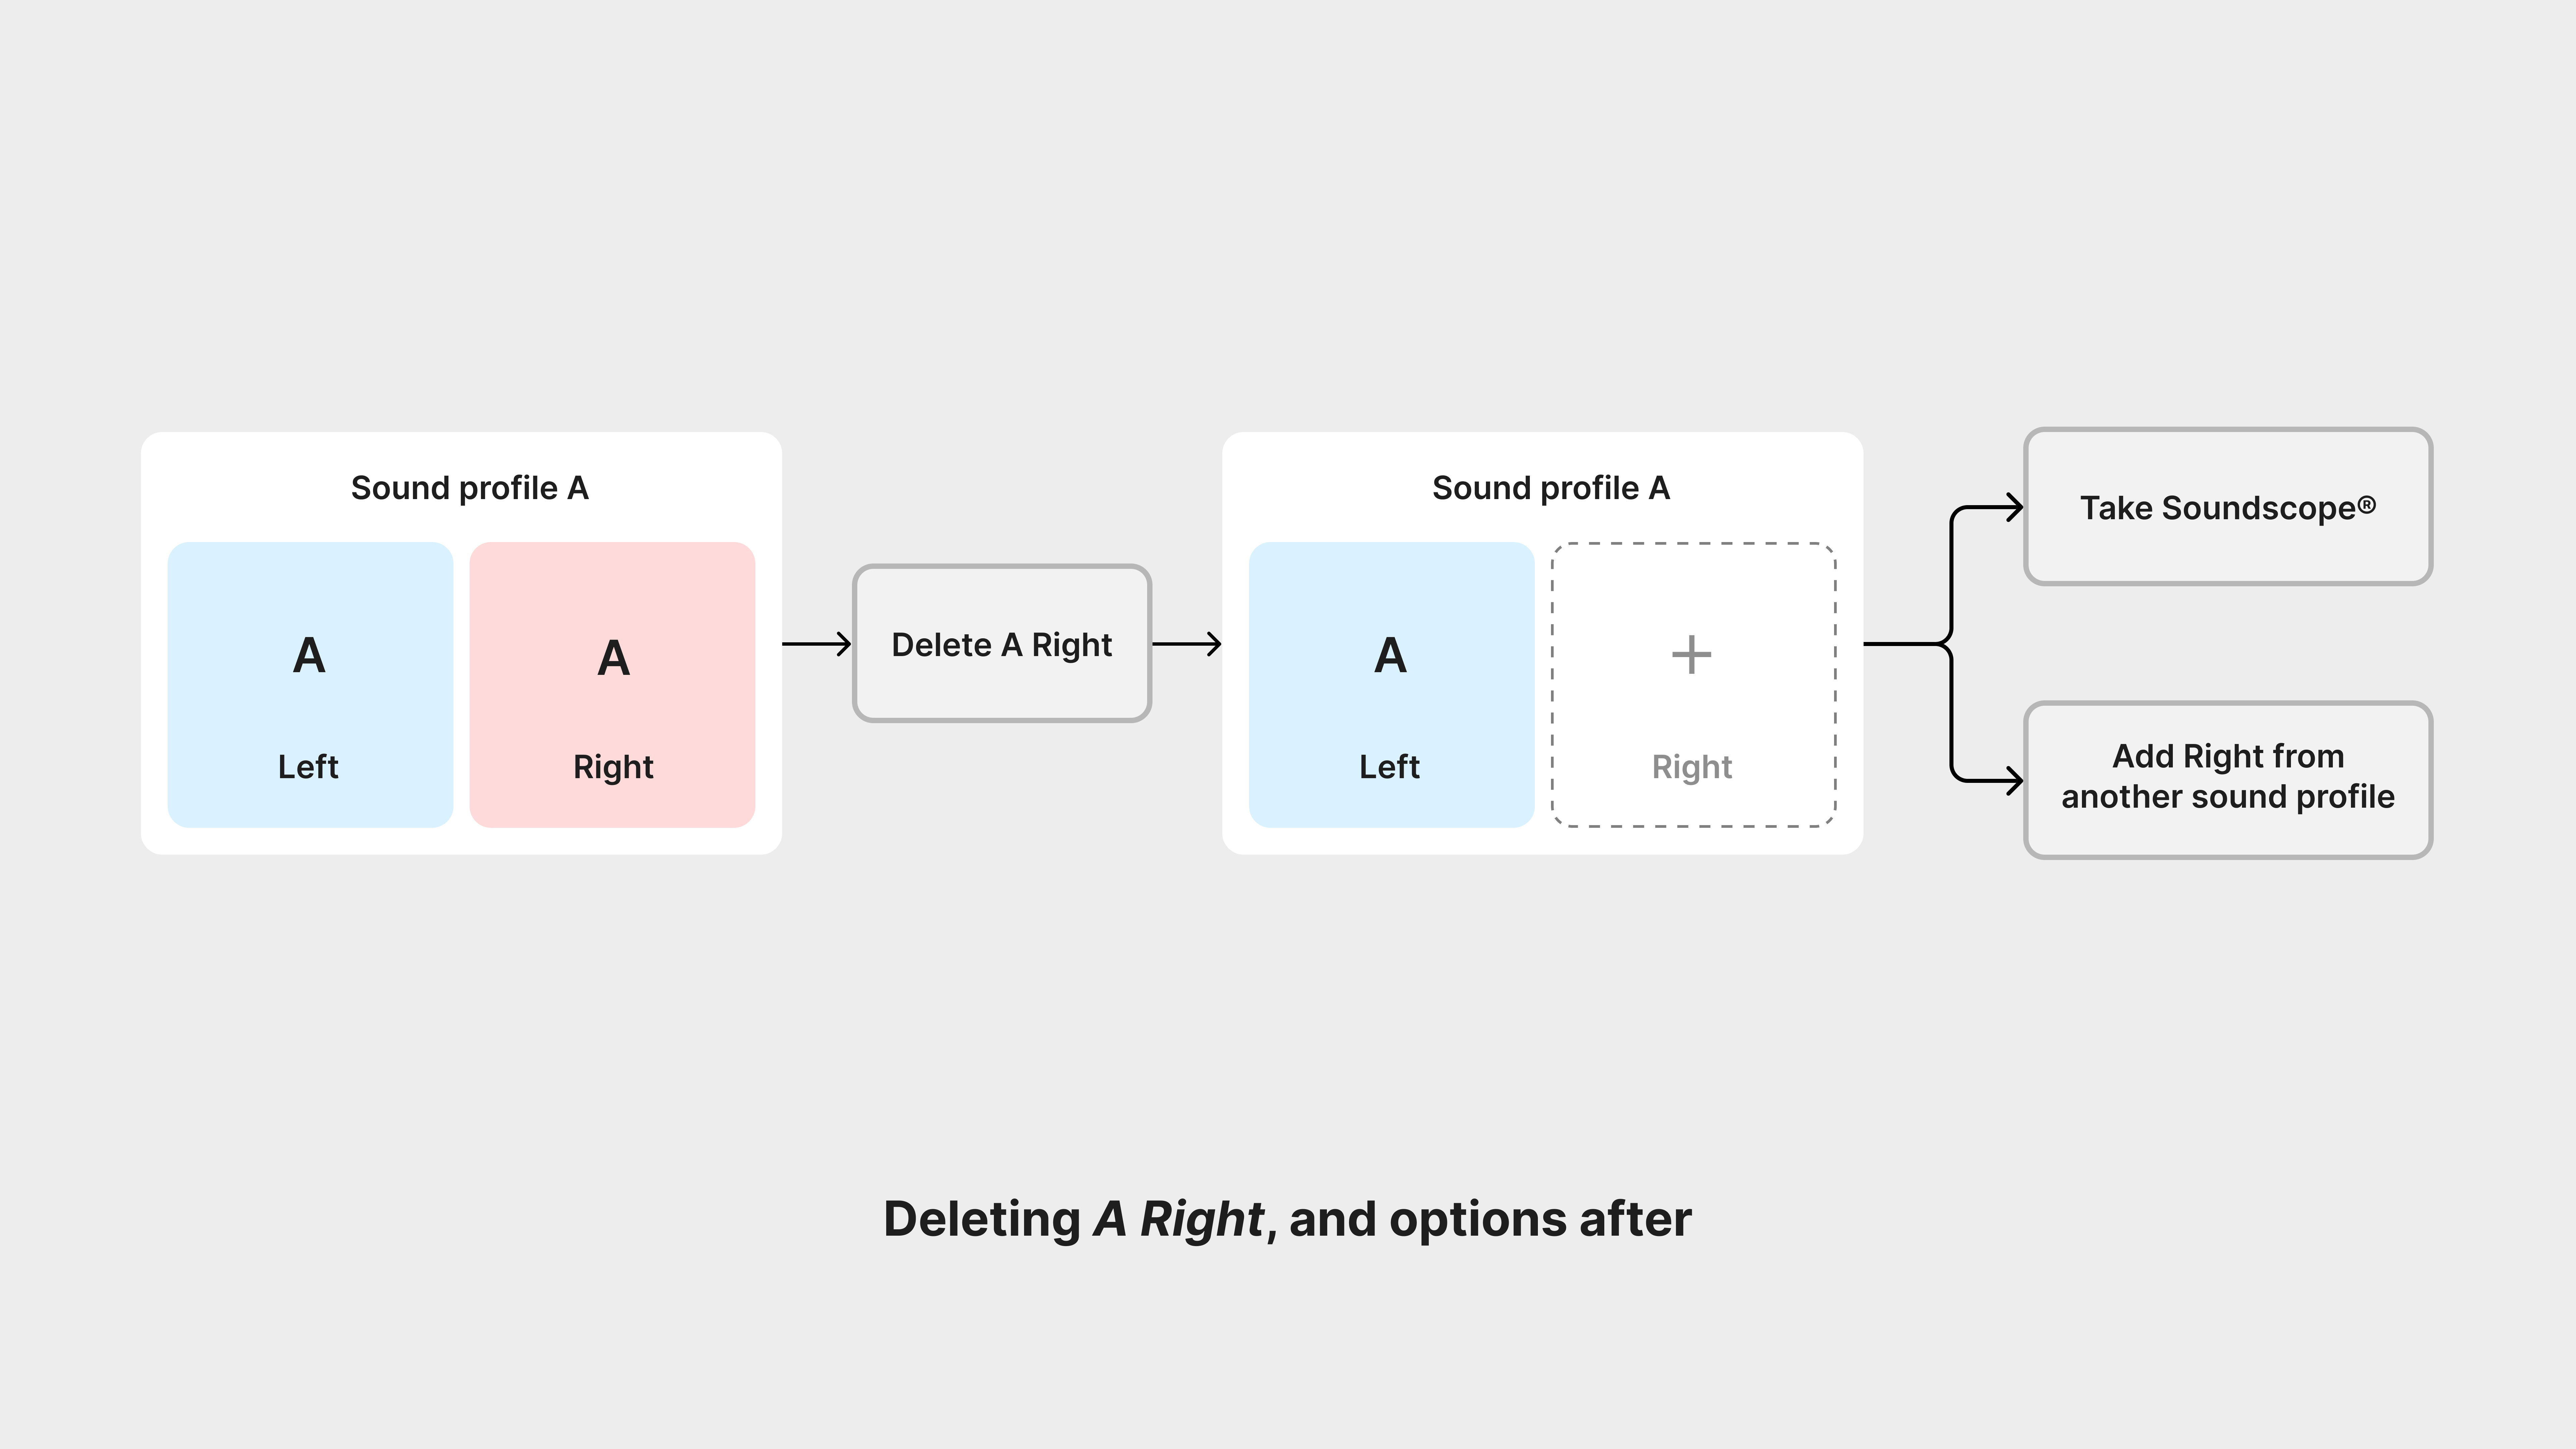
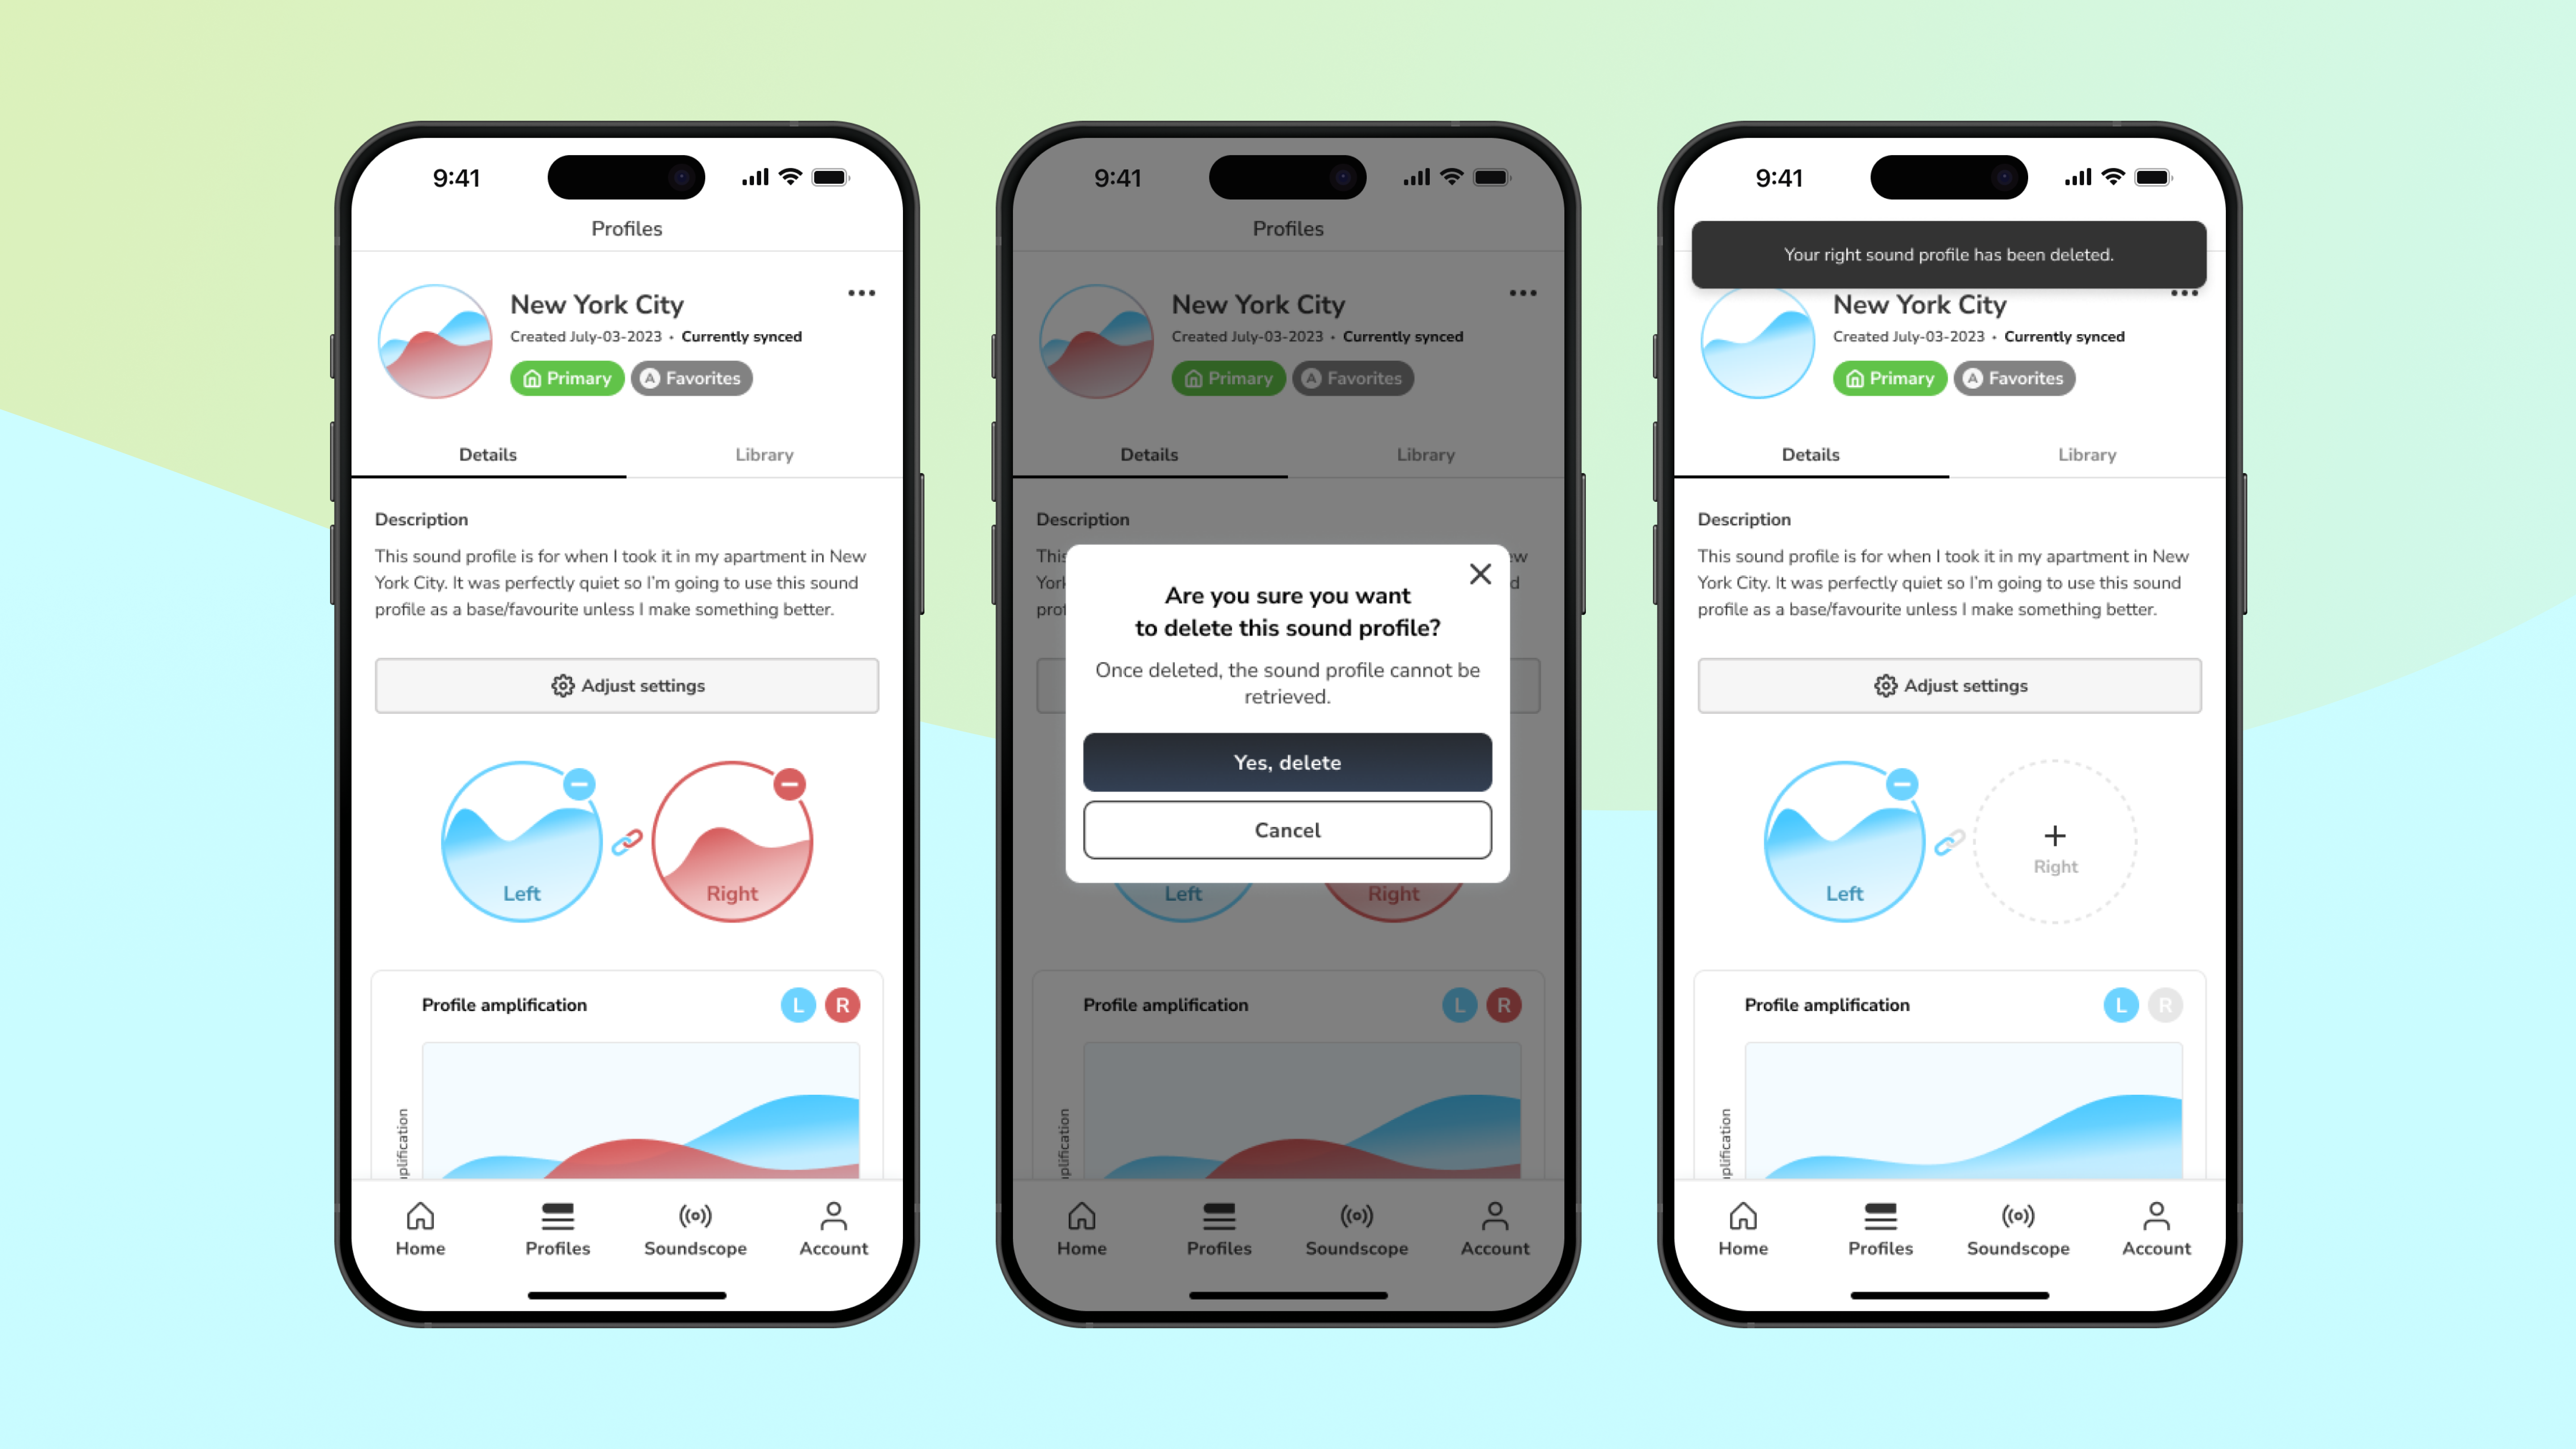
The user flow for deleting a left/right side of a finished sound profile, and the options to finish that sound profile.
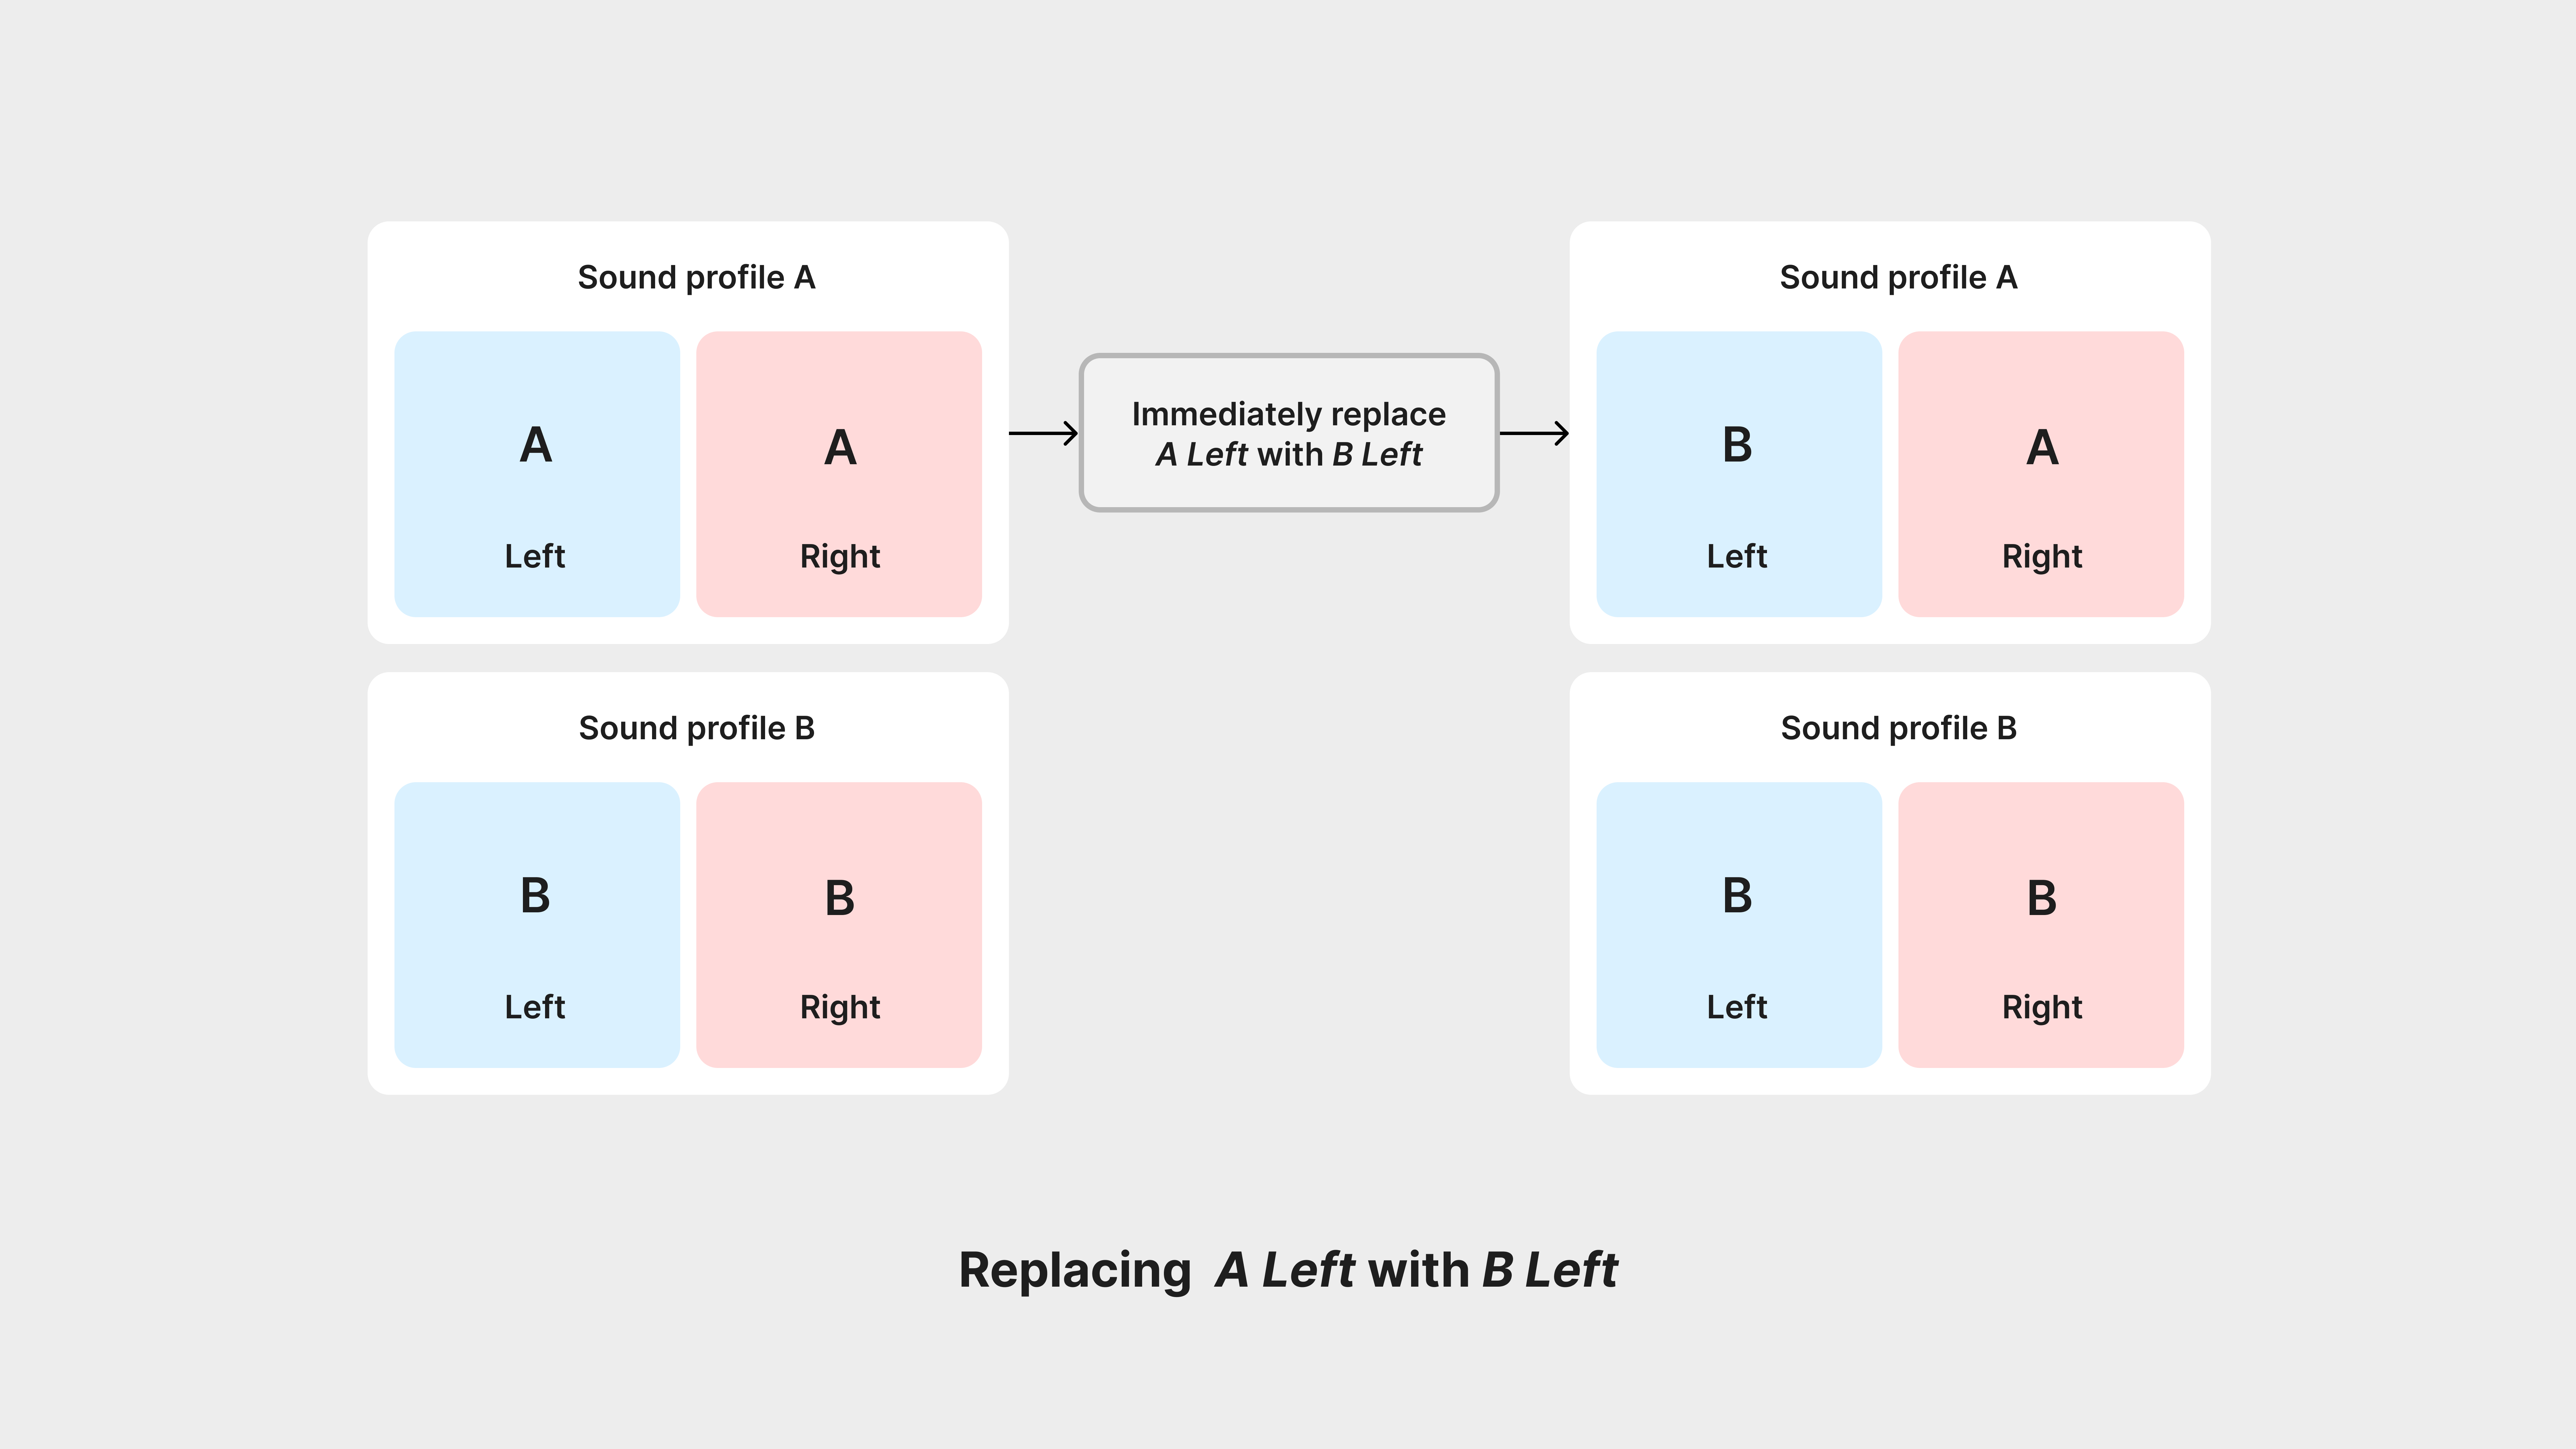
The user flow of replacing a left/right sound profile. It’s pretty simple! Note that replacing is not swapping, replacing is simply duplicating or copy and pasting a side of a sound profile.
Final user flow
Through this process of visualising the edge cases and user flows, I left with understanding that we needed to design for three needs of the users.
-
When a user wants to delete a sound profile.
-
When a user wants to replace a sound profile.
- When a user wants to take Soundscope™.
Wireframing + Designing
Previous iterations
Before we officially began this project, I had worked on a project that involved both mixing the sound profiles, and also linking and unlinking them. This idea never came to fruition because we now we can link sound profiles, but it was helpful to have drafted them as we developed our product strategy for this project.

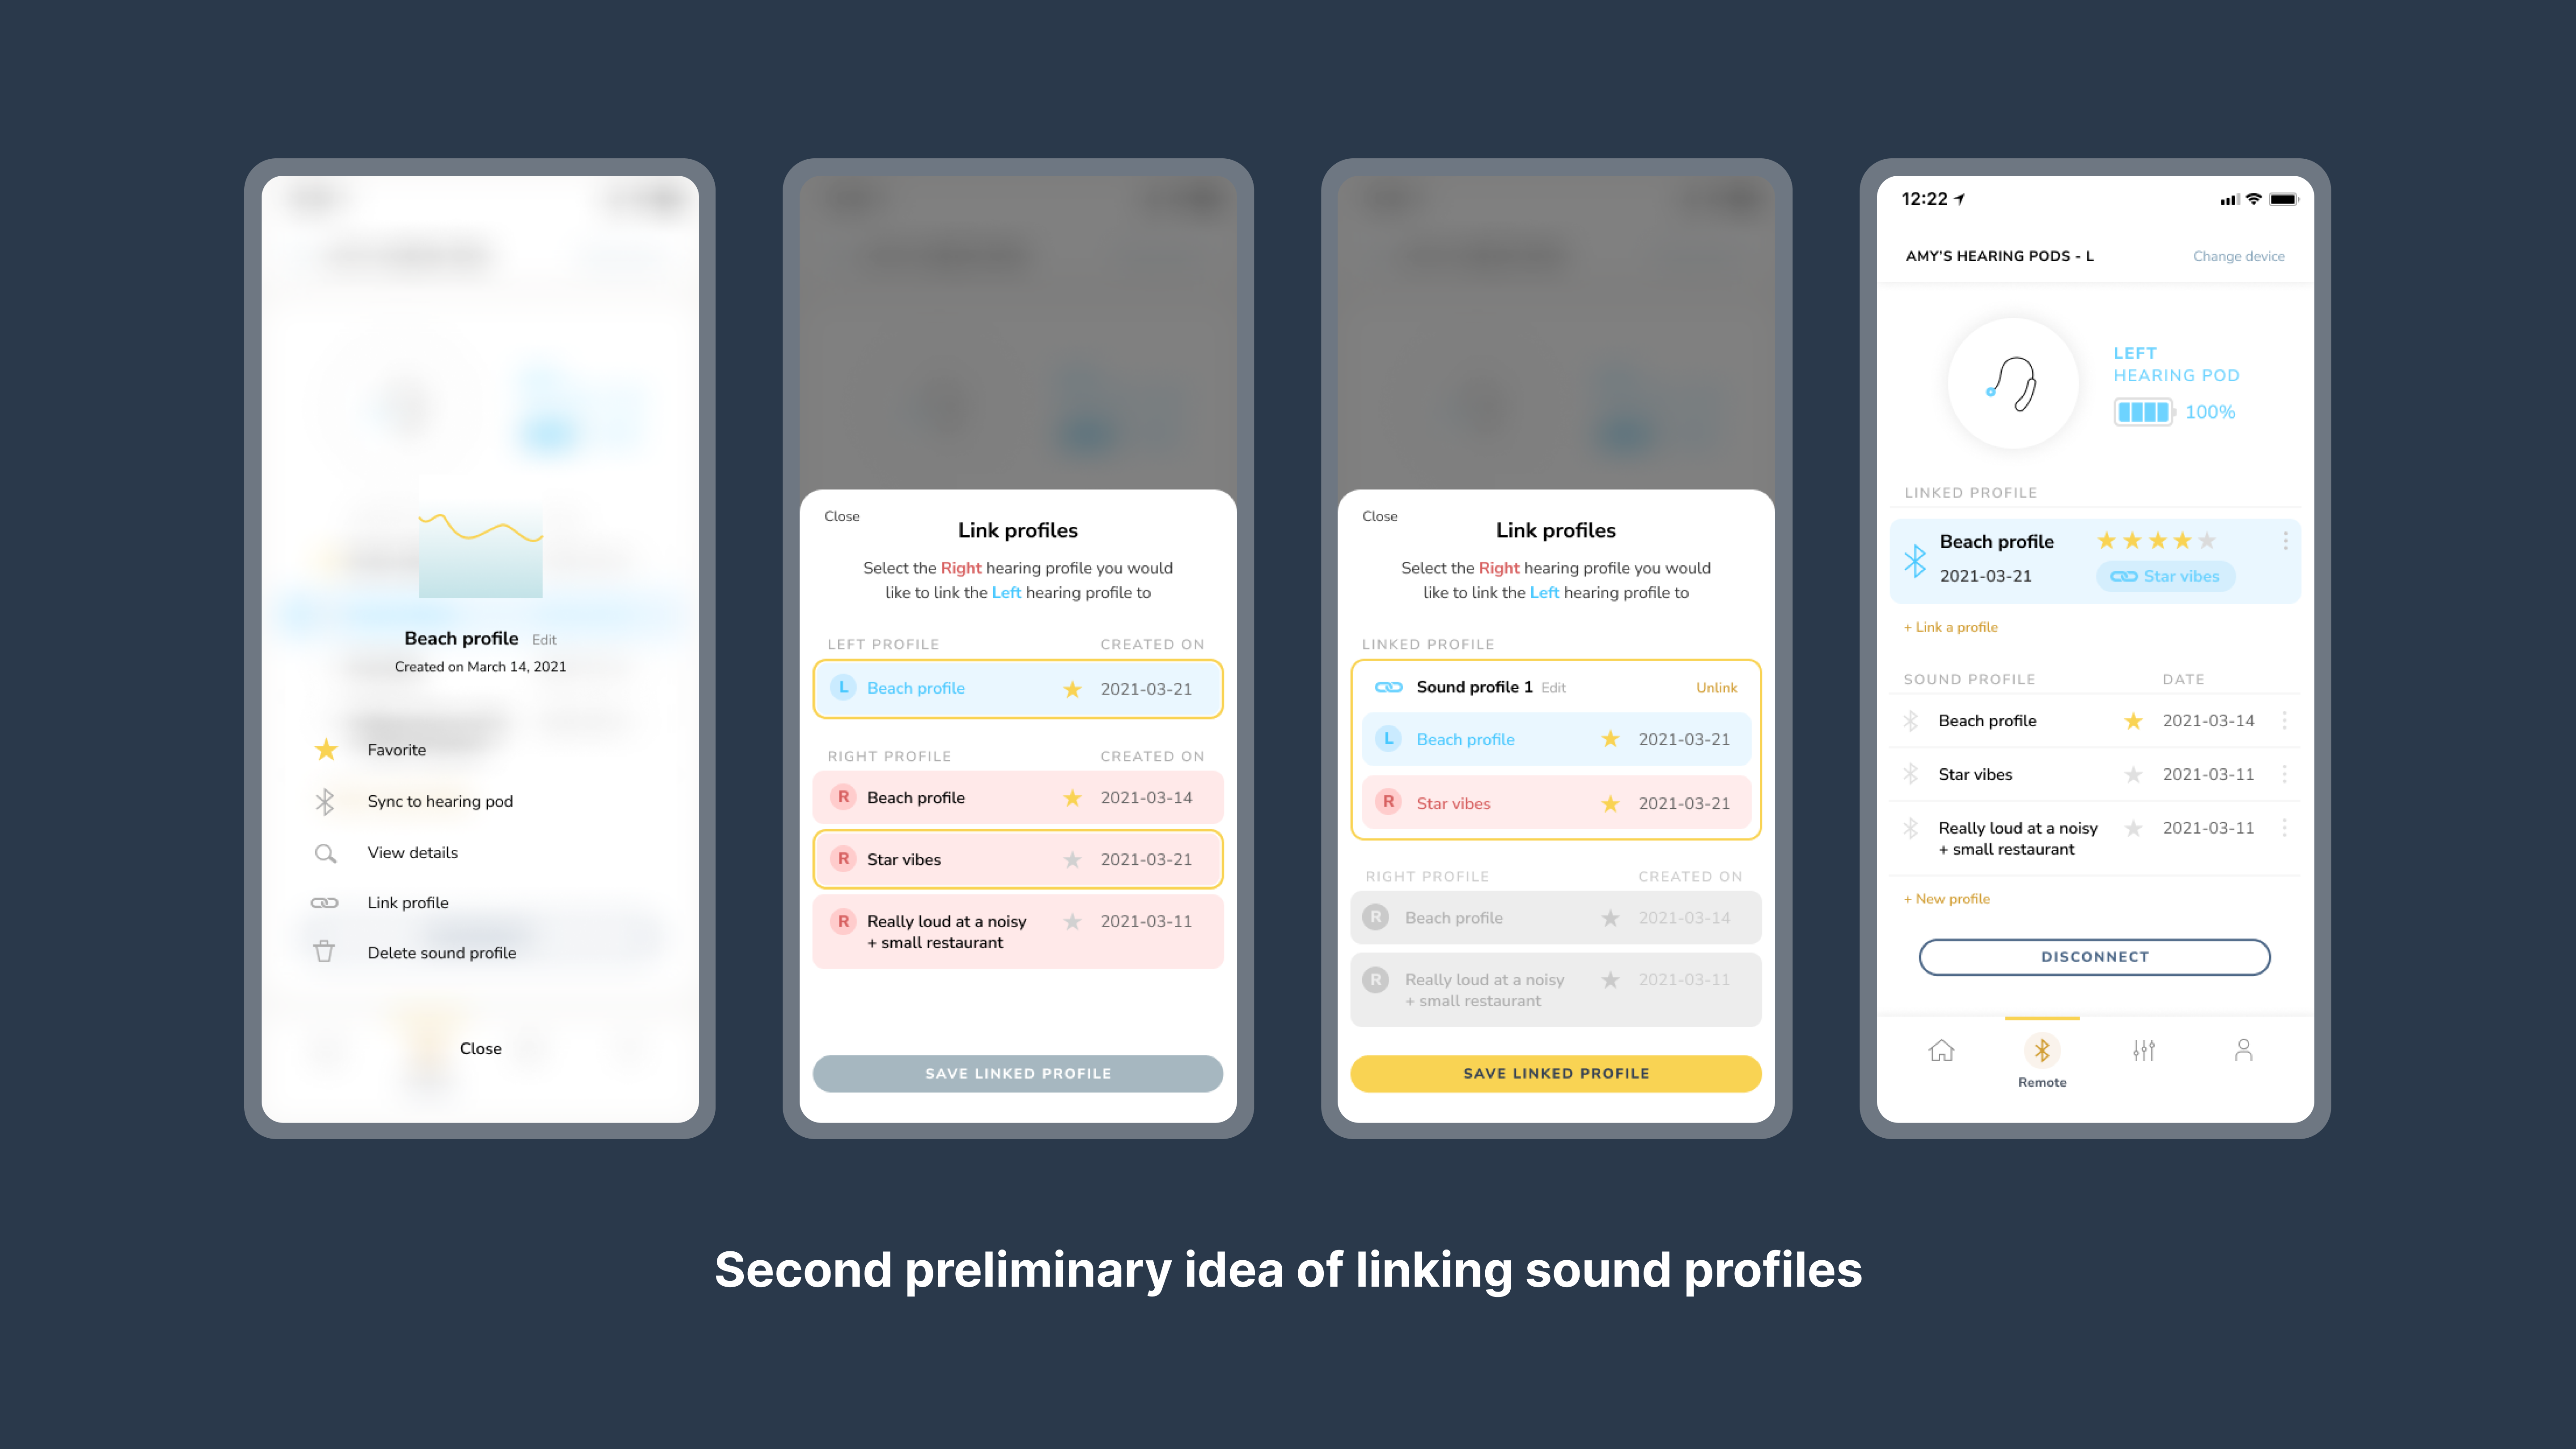
These iterations were inspired by something similar to a drag-and-drop mechanism. Essentially, users made separate left and right sound profiles, and could link and unlink them whenever.
Wireframing
When working on the wireframe, I came to understand that what we needed to design, was an edit and delete functionality. While there aren’t any existing hearing apps that share this same concept, I thought about common ways of deletion, replacing, and adding.
First I began with just simply placing this feature in our current progress of re-designing the app.
First I began with just simply placing this feature in our current progress of re-designing the app.

We played with the idea of putting the hearing aids visual in this feature, but decided it didn’t represent audio properly.
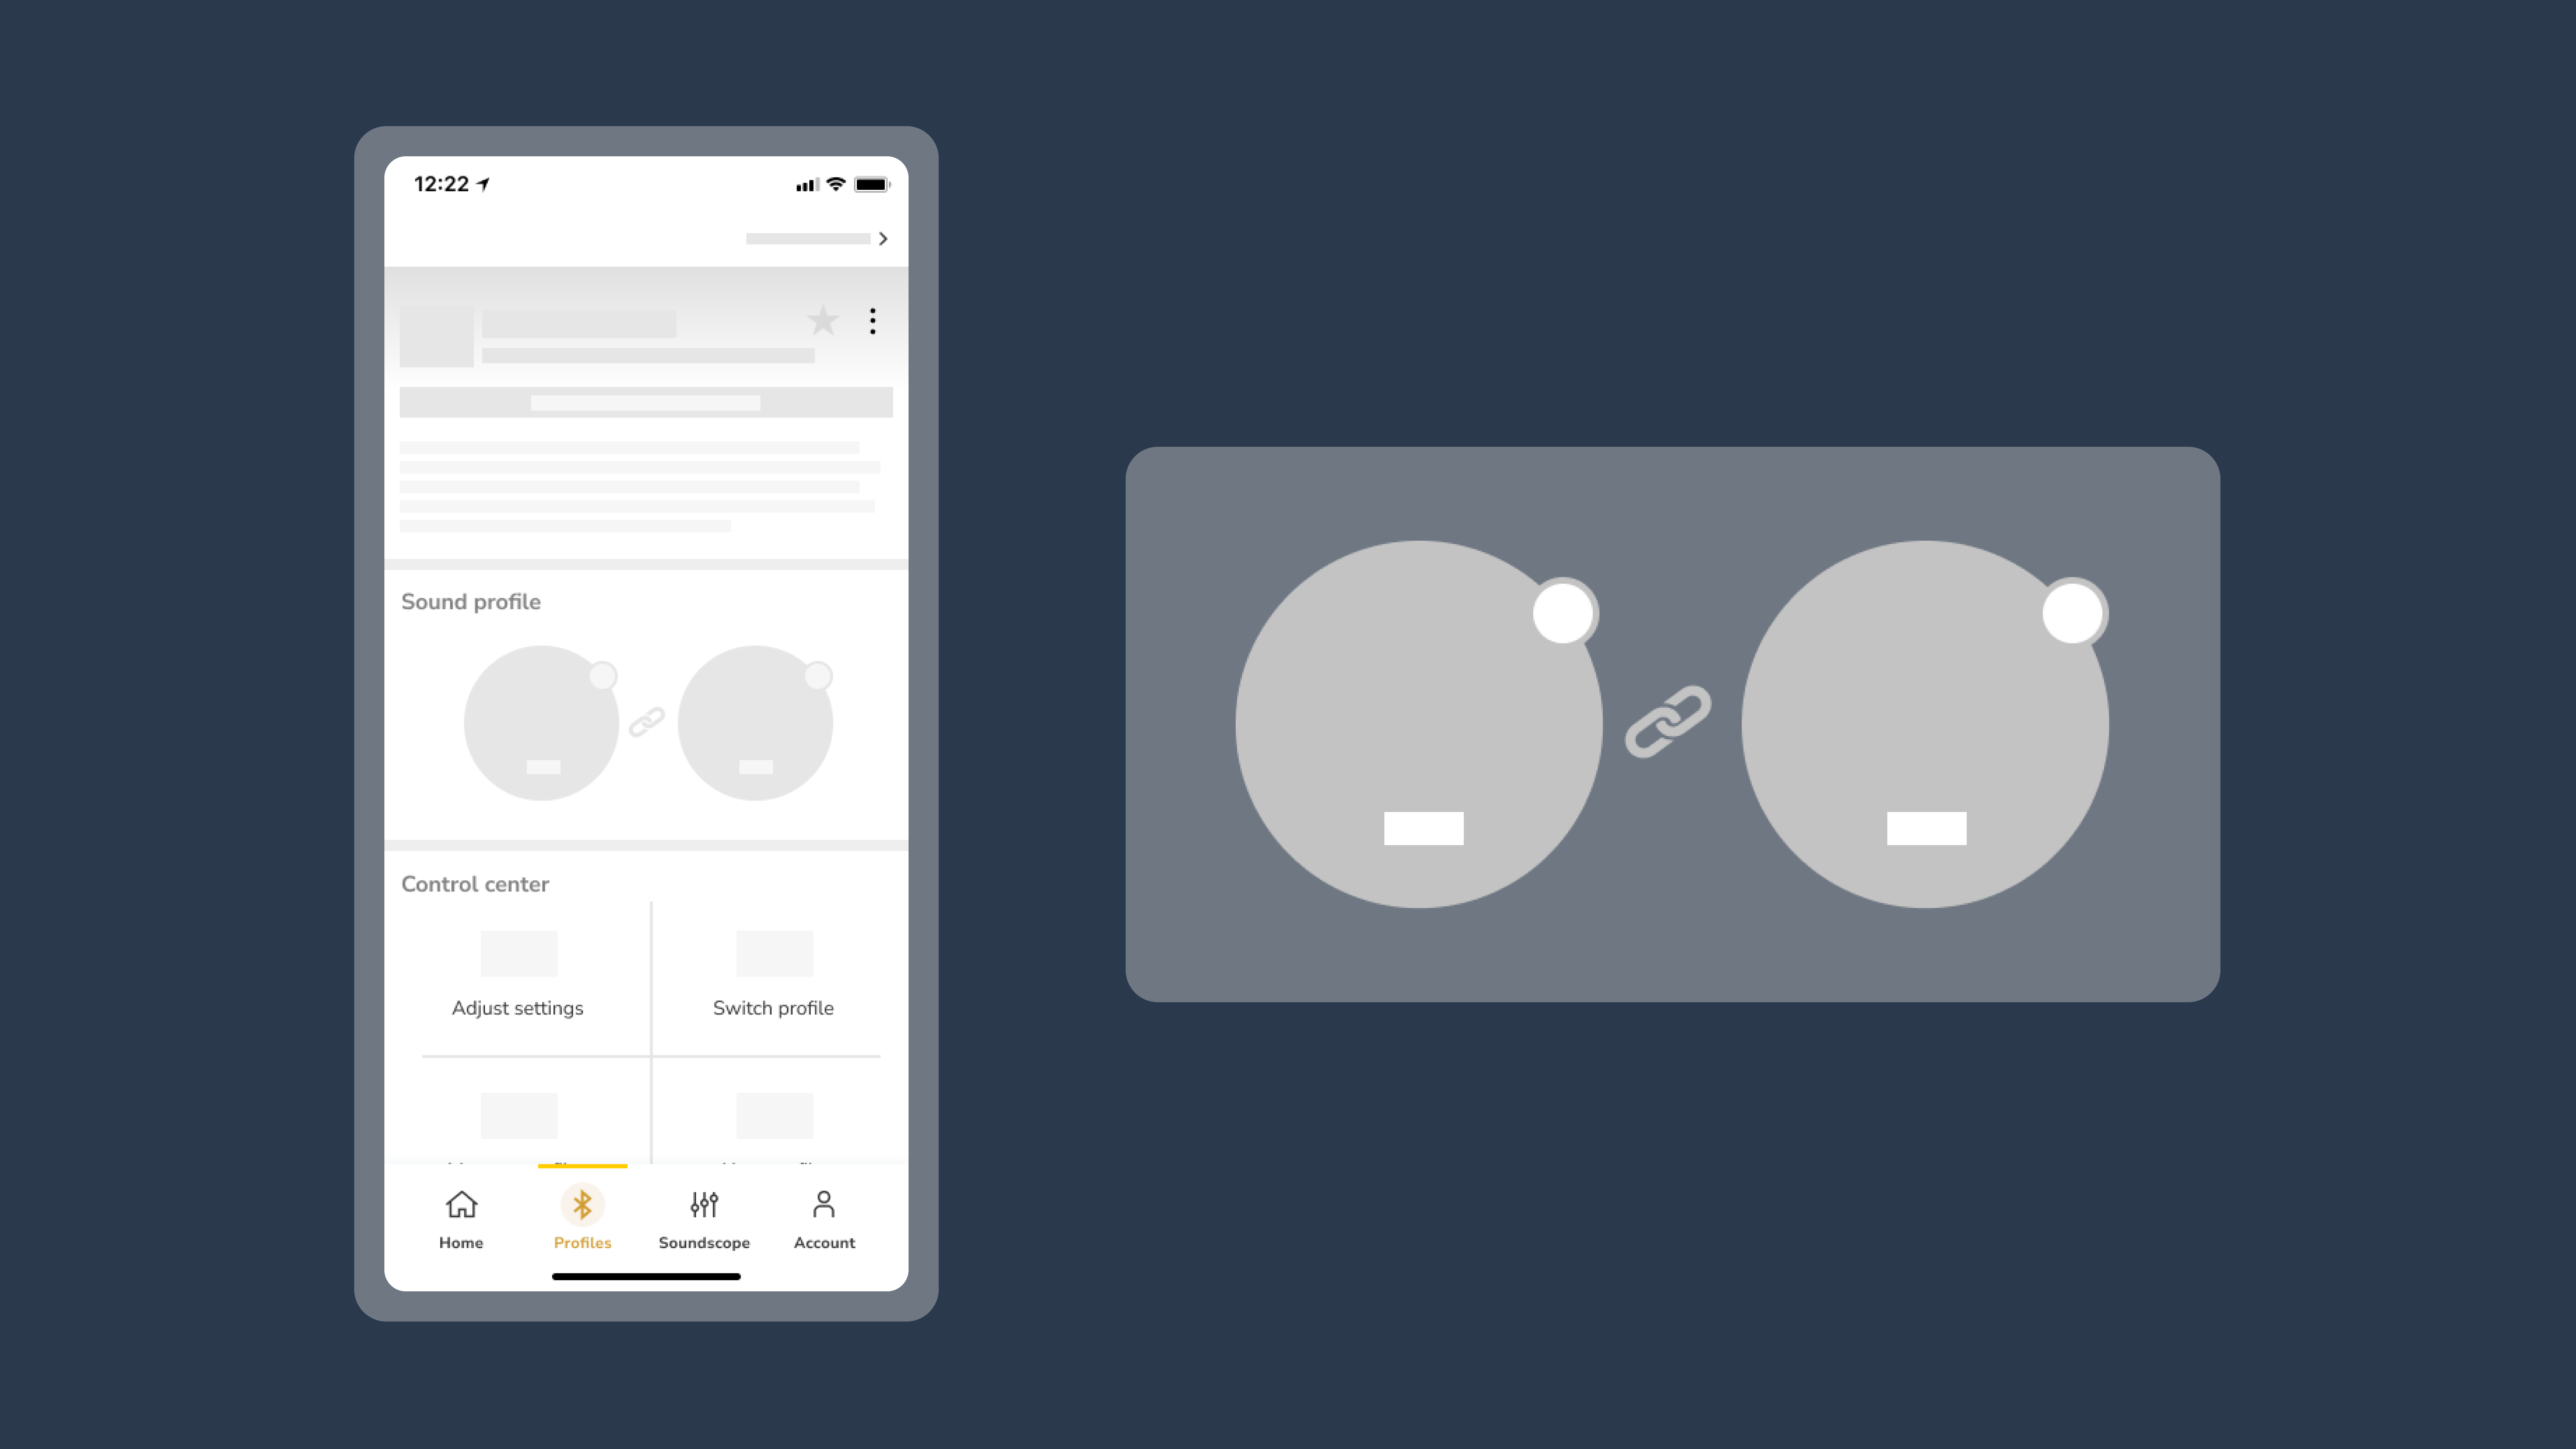
While the app was in this in-between stage, I wire-framed an idea I thought of regarding to linked sound profiles.
Wireframing (cont.)
I decided to keep these new wireframes simple. I felt like a basic design of a left and right side, explained how a sound profile worked without confusion. I went ahead and worked with circles, as it was a part of our branding.
This is what I knew I had to design:
Next, I began exploring options for the functionalities:
This is what I knew I had to design:
- Left and right sound profiles: We needed to explain that this feature, and the entire app, is exactly how a set of hearing aids work, which is that it has a left and right hearing aid.
- Functionalities: Delete, add, and replace
Next, I began exploring options for the functionalities:
Some ideas for functionality on the sound profiles, and an empty state.
Designing
I played with a few options, such as a pencil edit icon, garbage delete icon, minus delete icon, and a plus icon for adding.
While the edit functionality made sense at first to verbally tell our users what the feature could do, it was another click to get to the final action. In addition, an edit pencil icon was not as clear that the sound profile could be deleted. Because of this, I decided on a minus icon rather than a garbage can icon for simplicity and universal recognition.
While the edit functionality made sense at first to verbally tell our users what the feature could do, it was another click to get to the final action. In addition, an edit pencil icon was not as clear that the sound profile could be deleted. Because of this, I decided on a minus icon rather than a garbage can icon for simplicity and universal recognition.
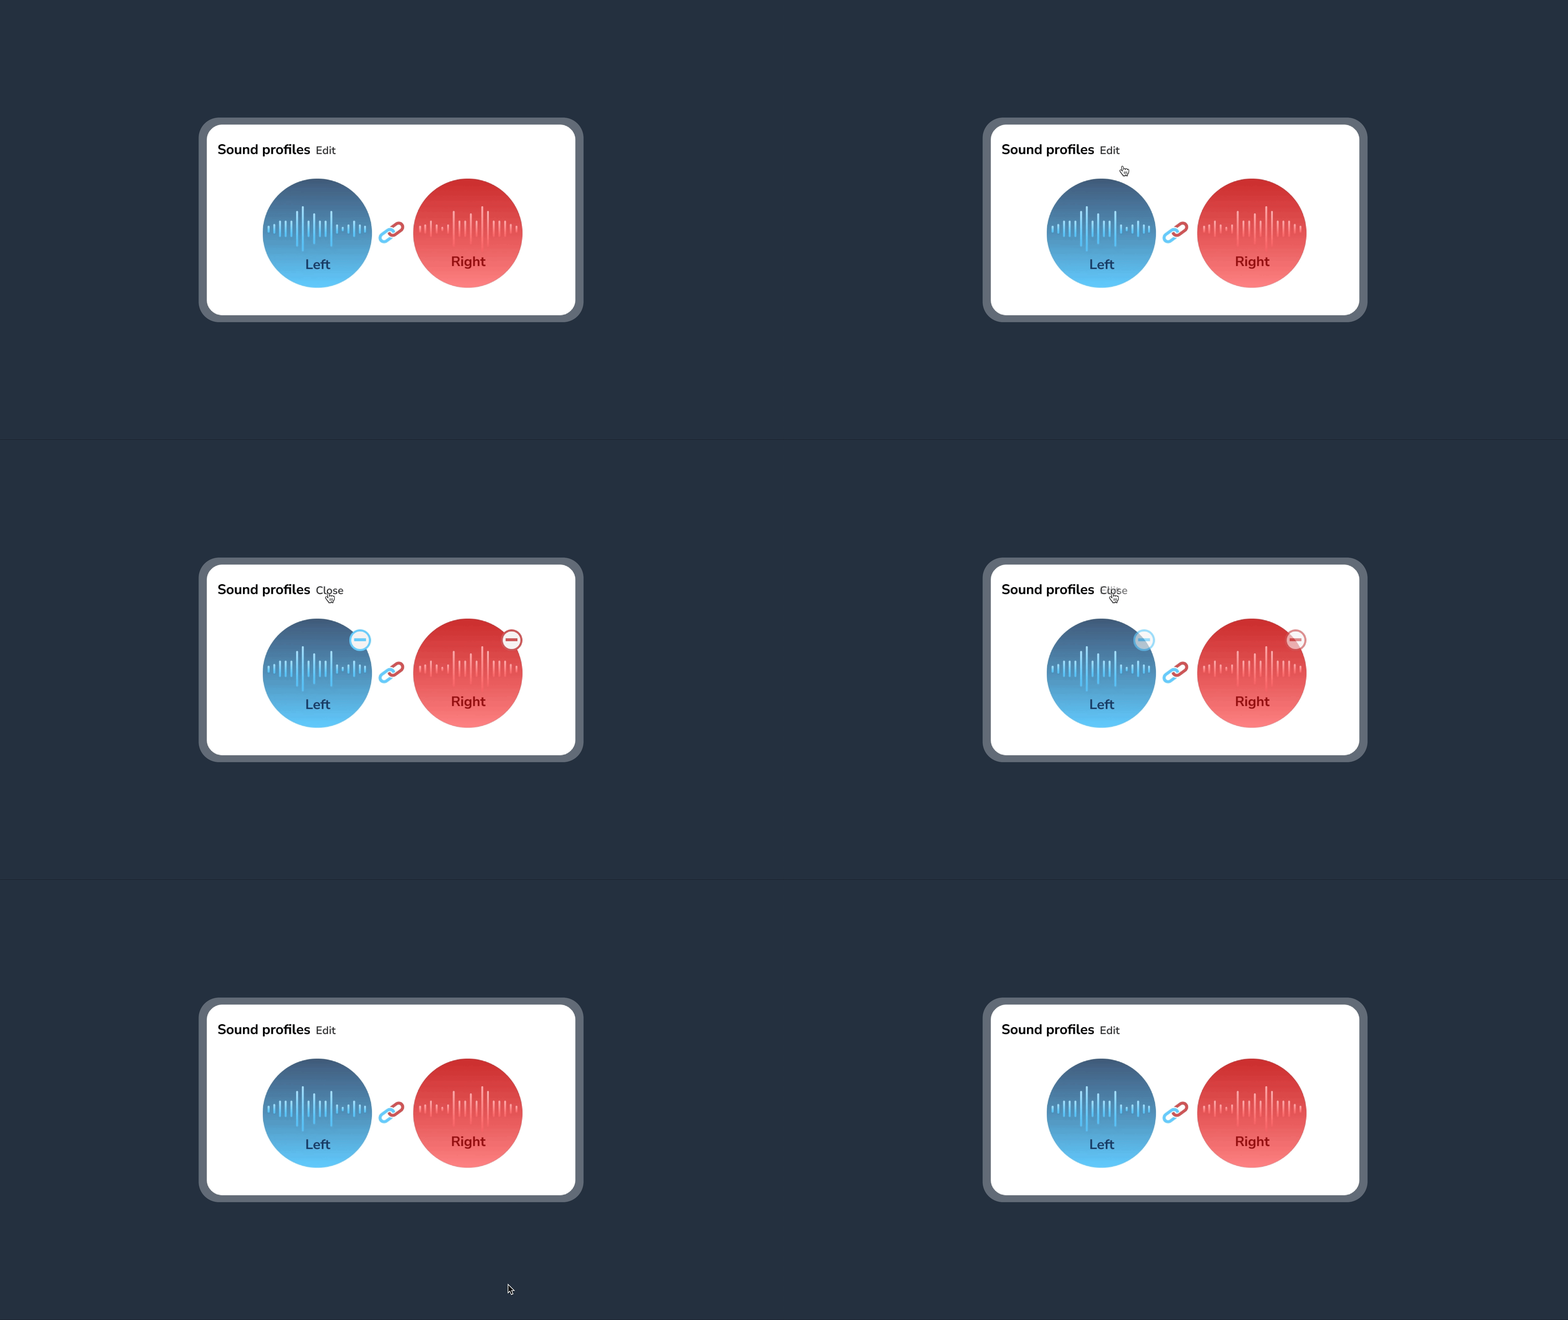
I played with the idea of the edit functionality, but ultimately decided that having multiple clicks to get to the final action was not ideal.
Designing (cont.)
In the center, I placed a link icon to show that these are linked sound profiles. Then, I made the first iterations of these designs, which included the three state of these components.
- Filled: When the sound profile has been made and is active,
- Empty: When there is no sound profile created.
- Muted: When there is a sound profile but users have muted their hearing aids.

(These designs examples, as two empty sound profiles cannot exist). I utilised the blue to match the left hearing aid receiver colour, and the red to match the right hearing aid receiver colour. It can be confusing for people to know which hearing aid goes in which ear.
![]()
I maintained the left-blue and right-red for consistency, and made the chart more simple. We also needed to eliminate some information, such as the lines on the graph and amp information. Please note that these amp chart waves are not accurate and are visual demonstration only.
![]()
With this amp chart information, I updated our designs for the linked sound profiles!
Designing (cont.)
These designs featured sound waves to re-inforce the idea that our sound profiles allow user to hear clearly. However, I wanted a way to give the experience more meaningful information. It was important to me that we give our users helpful data to inform their decision of if they even wanted to mix their sound profiles.
After discussing with the iOS engineers, we learned that we could derive data from the amplification chart that users receive after taking Soundscope®, and input the waves into the sound profile designs.
Here is what the amplification chart looked like. We did a quick re-design in order to continue the process of re-designing the app.

I maintained the left-blue and right-red for consistency, and made the chart more simple. We also needed to eliminate some information, such as the lines on the graph and amp information. Please note that these amp chart waves are not accurate and are visual demonstration only.

With this amp chart information, I updated our designs for the linked sound profiles!
Designing (cont.)
While users can look at their amplification charts to compare the differences in their sound profiles, I decided that consistency was best to ensure that our users could understand what our system meant, in relation to their hearing loss.
The final designs
Final designs
With the user flow already finished, I put together the final designs.
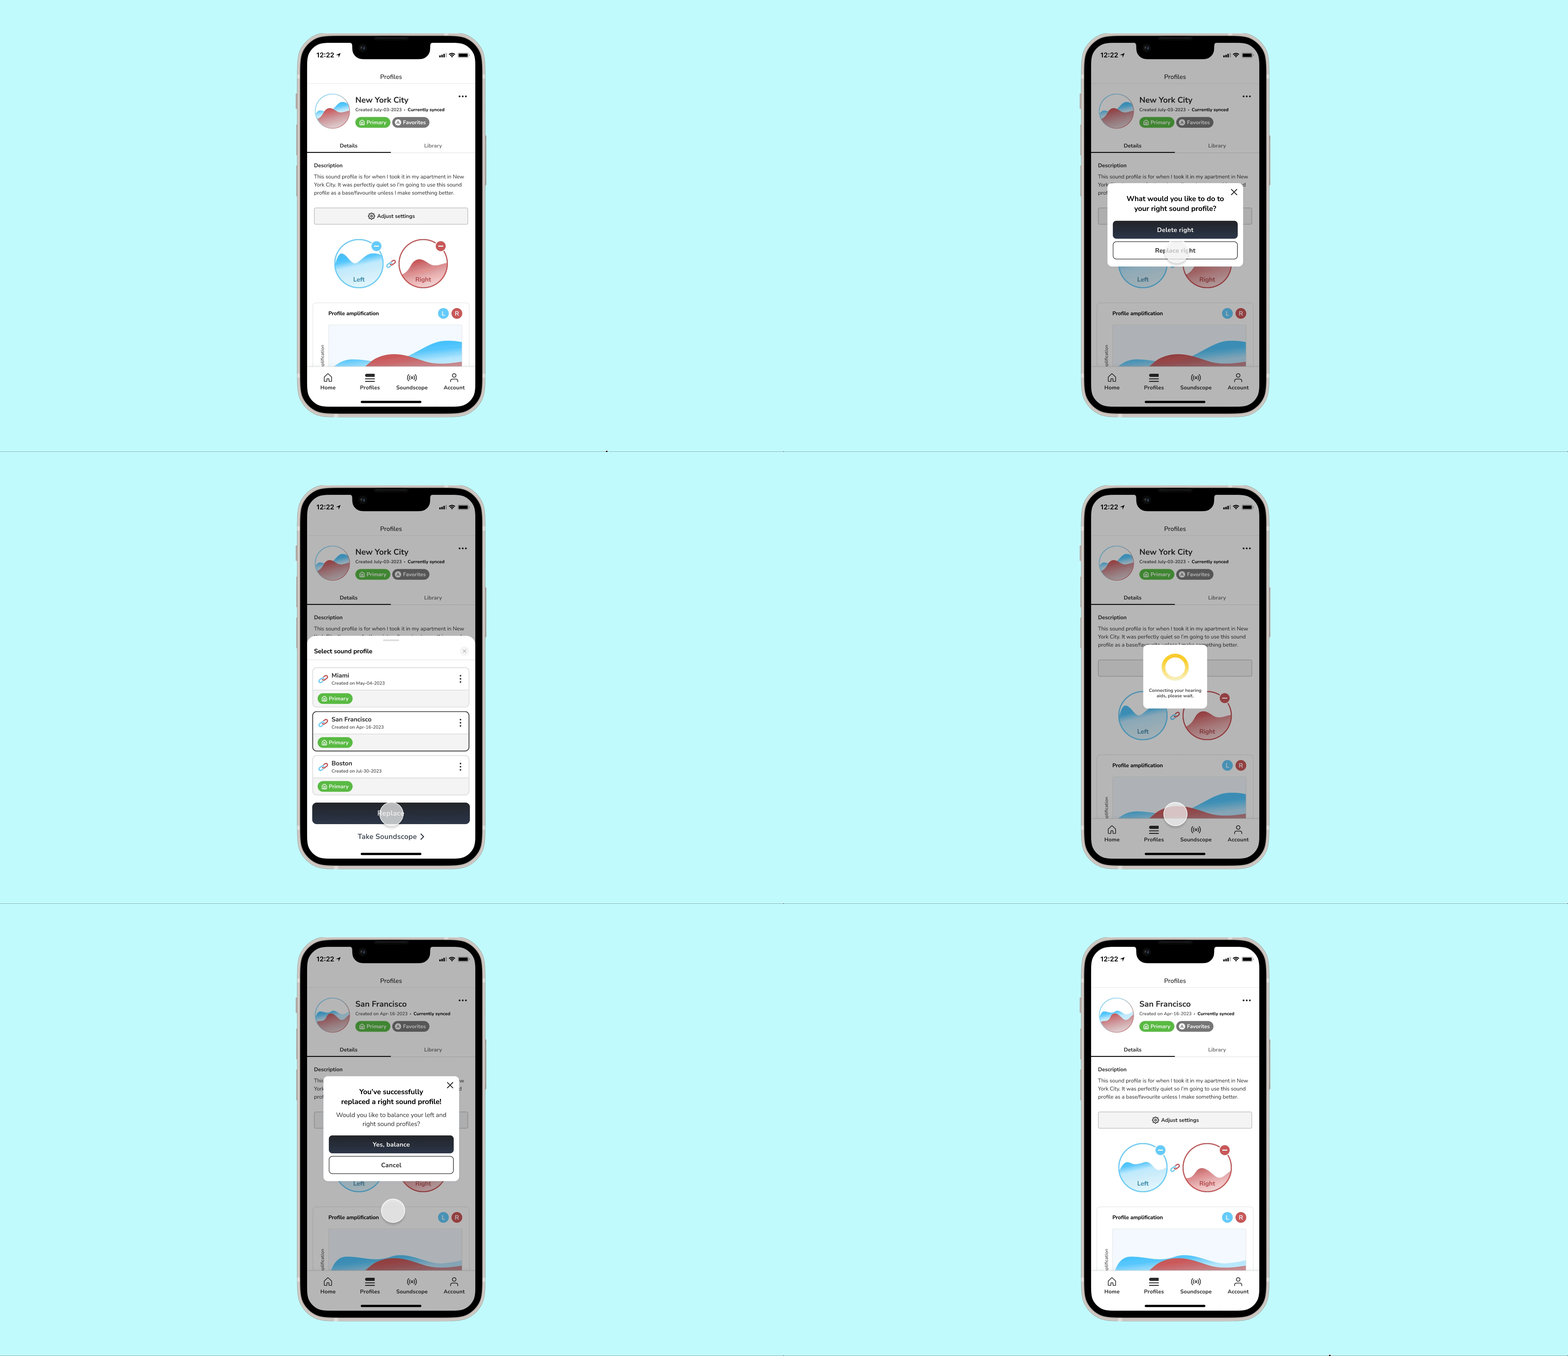

Replacing a sound profile.
![]()
![]()
Deleting a side of a sound profile
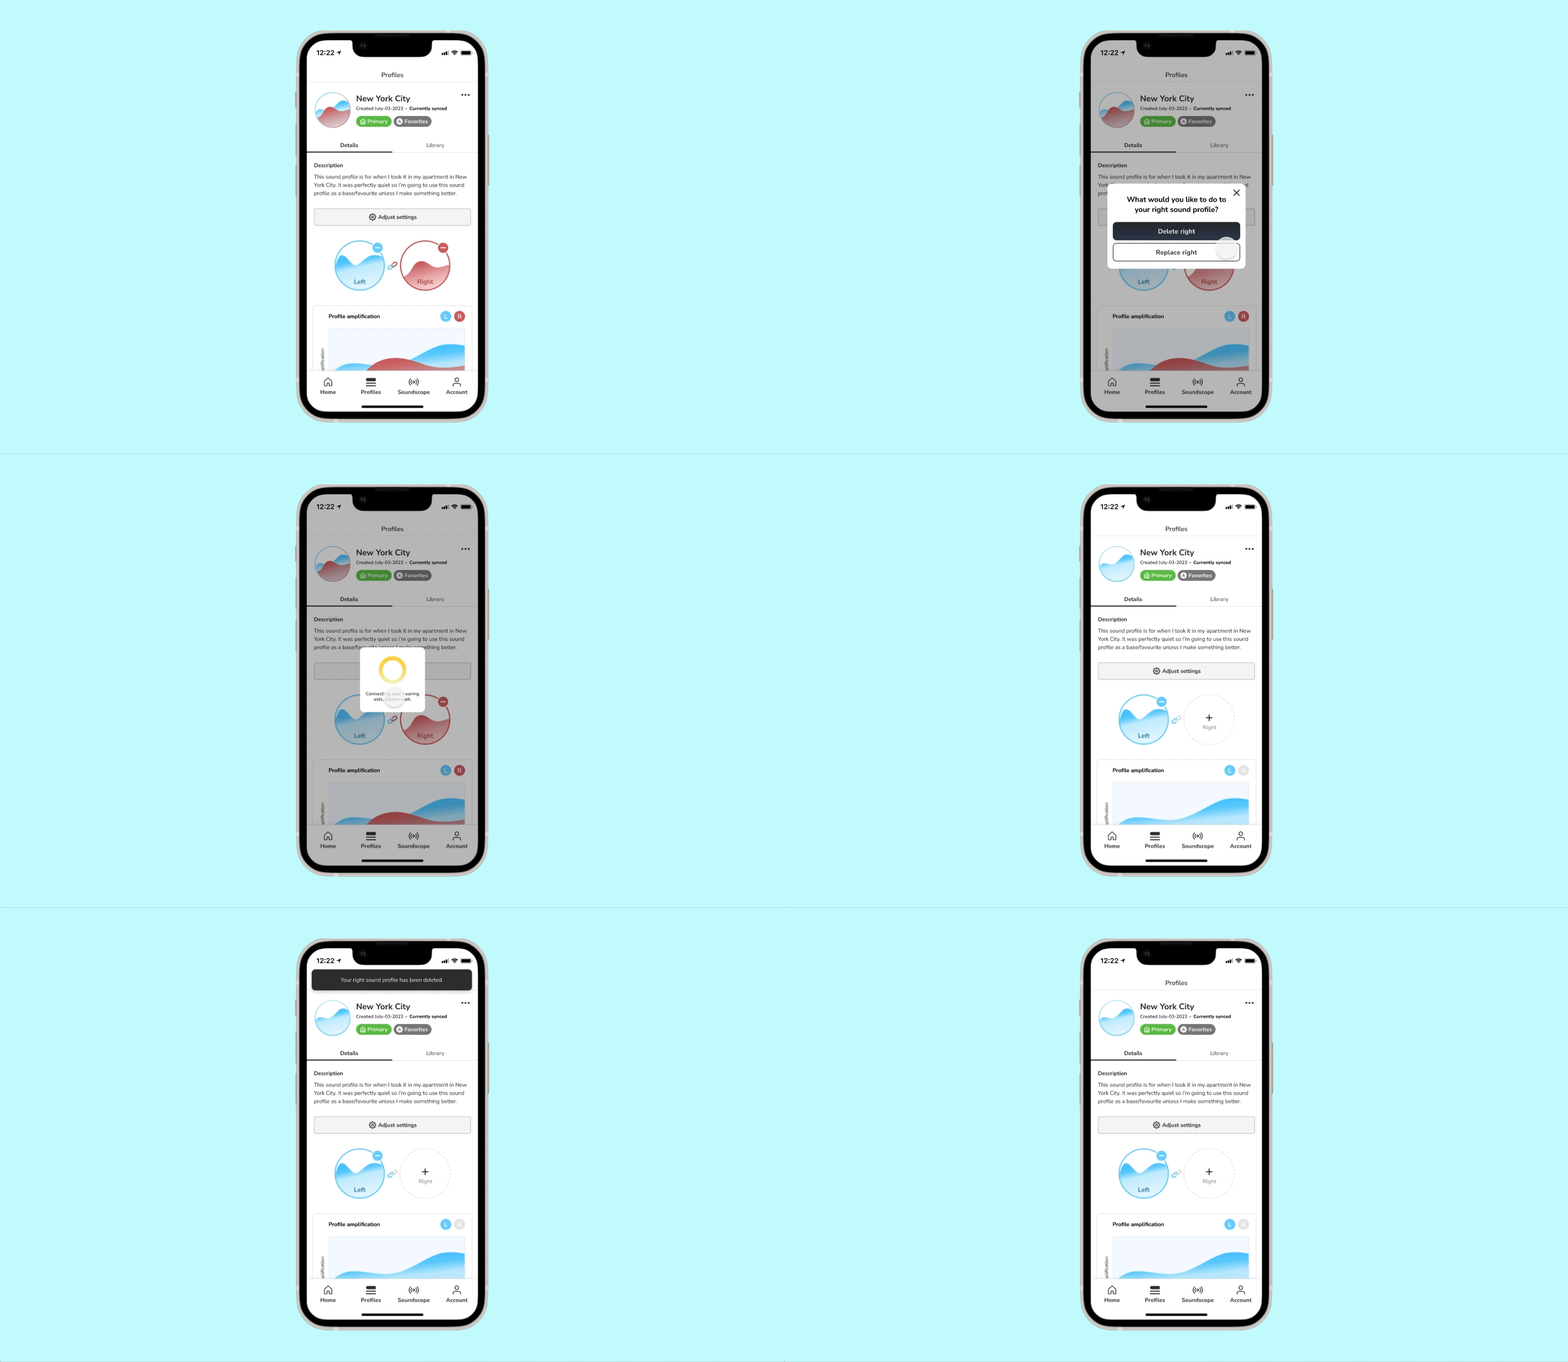

Deleting a side of a sound profile
What we learned
While not every user is advanced or interested enough to use this feature, we knew it would resolve for the issue for when someone makes a separate left and right sound profile and wanted to combine them into a linked sound profile.
In the future, we would love to provide more audio details to our sound profiles, so people know exactly the differences between sound profiles. That way, they can have a clearer sense of what sound profile they are making when mixing their profiles.
In addition, we have created a tool where they can quickly preview their sound profile and listen to them during the replacing process, but we did not include that feature in the scope of this project for many reasons.
This project was so much fun to work on, and I personally enjoyed playingn around the sound profiles!
View the next case study
